本文最后更新于 2026年4月17日 早上
最新有个检测区域内是否有人的需求,一开始试着用modelscope上的模型,但是速度太慢,无法满足实时检测。在朋友推荐下发现了yolov5,本文是对其使用的笔记。
前言 yolov5的github仓库 ,需要翻墙的文档中心 。首先当然推荐去看官方提供的资料,新鲜度和正确性有保障。以下只是我自己的操作笔记。
环境 仍然是在windows中,官方要求Python>=3.7.0,我这里就安装3.8了 PyTorch >=1.7,安装最新的就好
1
2
3
4
5
6
conda create -n yolo python=3 .8 activate yoloconda install pytorch torchvision torchaudio pytorch-cuda=11 .6 -c pytorch -c nvidiagit clone https://github.com/ultralytics/yolov5cd yolov5pip install -r requirements.txt
如果遇到错误
1 WARNING: Ignore distutils configs in setup.cfg due to encoding errors.
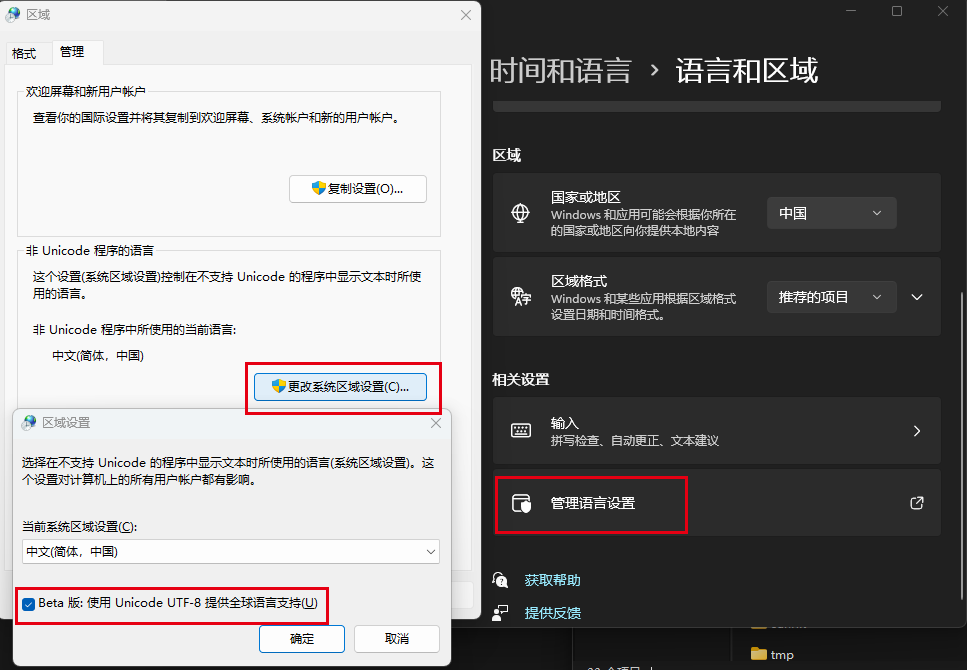
点击win按键,输入更改国家或地区,进入设置页面,选择管理语言设置,新弹出区域的配置框,选择管理子菜单,再选择更改系统区域设置,勾选 beta版:使用UTF8,确定后重启即可
如果是使用PyTorch Hub来使用就无需克隆仓库,直接安装环境
1 pip install -r https:// raw.githubusercontent.com/ultralytics/y olov5/master/ requirements.txt
推理 默认模型能够推理80种类别
1
2
3
4
5
6
7
8
9
10
11
12
13
14
15
16
17
18
19
20
21
22
23
24
25
26
27
28
29
30
31
32
33
34
35
36
37
38
39
40
41
42
43
44
45
46
47
48
49
50
51
52
53
54
55
56
57
58
59
60
61
62
63
64
65
66
67
68
69
70
71
72
73
74
75
76
77
78
79
80
0 : person1 : bicycle2 : car3 : motorcycle4 : airplane5 : bus6 : train7 : truck8 : boat9 : traffic light10 : fire hydrant11 : stop sign12 : parking meter13 : bench14 : bird15 : cat16 : dog17 : horse18 : sheep19 : cow20 : elephant21 : bear22 : zebra23 : giraffe24 : backpack25 : umbrella26 : handbag27 : tie28 : suitcase29 : frisbee30 : skis31 : snowboard32 : sports ball33 : kite34 : baseball bat35 : baseball glove36 : skateboard37 : surfboard38 : tennis racket39 : bottle40 : wine glass41 : cup42 : fork43 : knife44 : spoon45 : bowl46 : banana47 : apple48 : sandwich49 : orange50 : broccoli51 : carrot52 : hot dog53 : pizza54 : donut55 : cake56 : chair57 : couch58 : potted plant59 : bed60 : dining table61 : toilet62 : tv63 : laptop64 : mouse65 : remote66 : keyboard67 : cell phone68 : microwave69 : oven70 : toaster71 : sink72 : refrigerator73 : book74 : clock75 : vase76 : scissors77 : teddy bear78 : hair drier79 : toothbrush
使用detect.py 使用方式也很简单,进入仓库目录,执行detect.py,例如我用DroidCam软件在手机上起了个远程摄像头,那么通过下来代码实现实时检测
1 python detect.py --source http:
source可以传入多种类型:
1
2
3
4
5
6
7
python detect.py --source 0 'path/*.jpg' 'https://youtu.be/Zgi9g1ksQHc' 'rtsp://example.com/media.mp4'
关于detect的参数可以在文件中查看parse_opt()函数。
使用PyTorch Hub 官方文档 ,对此有专门小结描述。以下是其使用示例
1
2
3
4
5
6
7
8
9
10
11
12
13
14
15
16
17
18
19
20
21
22
23
24
25
26
27
import cv2import torchfrom PIL import Image'ultralytics/yolov5' , 'yolov5s' )for f in 'zidane.jpg' , 'bus.jpg' :'https://ultralytics.com/images/' + f, f) open ('zidane.jpg' ) 'bus.jpg' )[..., ::-1 ] 640 ) print () 0 ] 0 ]
model的相关配置
1
2
3
4
5
6
7
8
9
10
model.conf = 0.25 iou = 0.45 agnostic = False multi_label = False classes = None max_det = 1000 amp = False results = model(im, size=320 )
选择加载方式
1
2
3
4
model.cpu() to (device) load ('ultralytics/yolov5' , 'yolov5s' , device='cpu' )
静默加载
1 model = torch.hub.load('ultralytics/yolov5' , 'yolov5s' , _verbose=False )
训练 首先可以使用官网提供的代码来试一试训练
1 python train.py --img 640 --batch 16 --epochs 3 --data coco128.yaml --weights yolov5s.pt
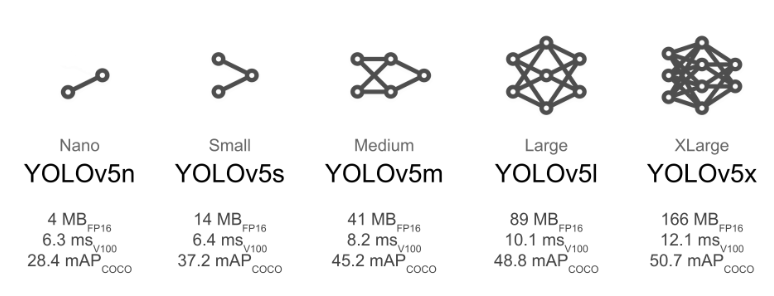
这里的img是图片尺寸,数据集用coco就基本完全不需要变了,batch就是那个batch_size,越大越快越消显存,epochs就是训练轮数,data则是在仓库目录data文件夹下的配置。weights是选择yolov模型,这里有张官网上的图
可以在调整batch后直接执行试试,coco128就是128张图,下载和训练都很快。它会在你仓库目录的外层生成文件夹datasets来保存图片和对应信息,然后在仓库目录的runs/train中产出训练结果。
traun.py的参数说明 weights 1 parser.add_argument('--weights ', type =str , default =ROOT / 'yolov5s .pt ', help ='initial weights path ')
初始模型的地址,和检测时一样可以传输yolov5s.pt,yolov5m.pt等,也可以传入自己训练的模型
cfg 1 parser.add_argument('--cfg ', type =str , default ='', help ='model .yaml path ')
权重配置文件,nc、depth_multiple、width_multiple、anchors、backbone、head等
data 1 parser.add_argument('--data ', type =str , default =ROOT / 'data / coco128 .yaml ', help ='dataset .yaml path ')
数据集,可以传入仓库根目录下data文件夹中的yaml
hyp 1 parser.add_argument('--hyp ', type =str , default =ROOT / 'data / hyps / hyp .scratch -low .yaml ', help ='hyperparameters path ')
初始超参文件
epochs 1 parser.add_argument('--epochs ', type =int , default =100, help ='total training epochs ')
训练轮次,官方文档建议从300开始调节
batch-size 训练批次大小,影响训练速度
1 parser.add_argument('--batch -size ', type =int , default =16, help ='total batch size for all GPUs, -1 for autobatch ')
img-size 1 parser.add_argument('--imgsz ', '--img ', '--img -size ', type =int , default =640, help ='train , val image size (pixels ) ')
原始图片分辨率,默认640*640
resume 1 parser.add_argument('--resume' , nargs ='?' , const =True , default =True , help ='resume most recent training' )
断点续训,也就是训练过程中意外终端,可以通过此变量继续训练, 默认False
nosave 1 parser.add_argument('--nosave ', action ='store_true ', help ='only save final checkpoint ')
不保存模型 默认False(保存)
device 1 parser.add_argument('--device ', default ='', help ='cuda device , i .e . 0 or 0,1,2,3 or cpu ')
用GPU还是CPU训练
single-cls 1 parser.add_argument('--single -cls ', action ='store_true ', help ='train multi -class data as single -class ')
数据集是否只有一个类别 默认False
rect 1 parser.add_argument('--rect ', action ='store_true ', help ='rectangular training ')
训练集是否采用矩形训练 默认False
noautoanchor 1 parser.add_argument('--noautoanchor' , action ='store_true' , help ='disable AutoAnchor' )
不自动调整anchor 默认False(自动调整anchor)
evolve 1 parser.add_argument('--evolve ', type =int , nargs ='?', const =300, help ='evolve hyperparameters for x generations ')
是否进行超参进化 默认False
multi-scale 1 parser.add_argument('--multi -scale ', action ='store_true ', help ='vary img -size +/ - 50%%')
是否使用多尺度训练 默认False
label-smoothing 1 parser.add_argument('--label -smoothing ', type =float , default =0.0, help ='Label smoothing epsilon ')
标签平滑增强 默认0.0不增强 要增强一般就设为0.1
cache-image 1 parser.add_argument('--cache ', type =str , nargs ='?', const ='ram ', help ='image --cache ram / disk ')
是否提前缓存图片到内存cache,加速训练 。 默认False
project 1 parser.add_argument('--project ', default =ROOT / 'runs / train ', help ='save to project / name ')
训练结果保存的根目录,默认是runs/train
name 1 parser.add_argument('--name ', default ='exp ', help ='save to project / name ')
训练结果保存的目录,默认是exp 最终: runs/train/exp
exist-ok 1 parser.add_argument('--exist -ok ', action ='store_true ', help ='existing project / name ok , do not increment ')
文件不存在就新建或increment name , 默认False(默认文件都是不存在的)
save_period 1 parser.add_argument('--save -period ', type =int , default =-1, help ='Save checkpoint every x epochs (disabled if < 1) ')
没间隔多少次保存一次检查点,默认-1,不进行保存
local_rank 1 parser.add_argument('--local_rank ', type =int , default =-1, help ='Automatic DDP Multi-GPU argument , do not modify ')
rank为进程编号,-1且gpu=1时不进行分布式,-1且多块gpu使用DataParallel模式
训练只检测人的模型 首先在仓库data目录下复制coco.yaml建立新文件coco-person.yaml。内容改为:
1
2
3
4
5
6
7
8
9
10
11
12
13
14
15
16
17
18
19
20
21
22
23
24
25
path: ../datasets/coco 0 : personfrom utils.general import download, PathFalse dir = Path(yaml['path' ]) 'https://github.com/ultralytics/yolov5/releases/download/v1.0/' 'coco2017labels-segments.zip' if segments else 'coco2017labels.zip' )] dir =dir .parent)'http://images.cocodataset.org/zips/train2017.zip' , 'http://images.cocodataset.org/zips/val2017.zip' , 'http://images.cocodataset.org/zips/test2017.zip' ] dir =dir / 'images' , threads=3 )
其实也就是将names中只保留0。然后打开utils/dataloaders.py,在其中找到include_class,应该在530行,修改
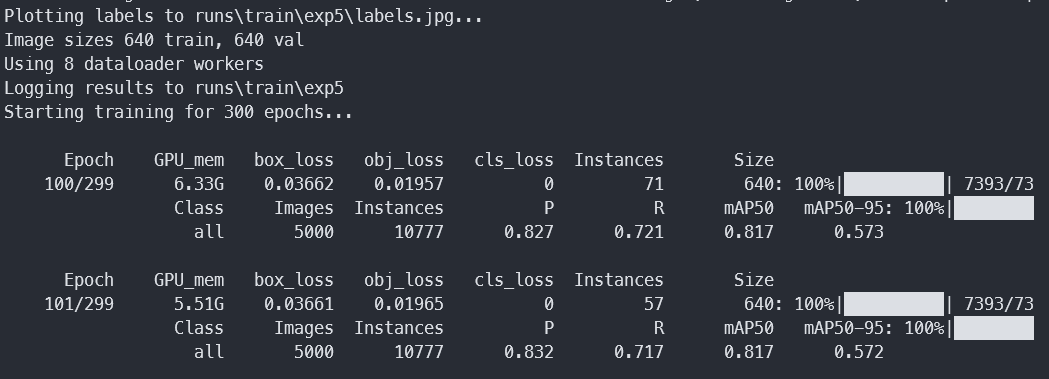
然后尝试出合适的batch,我这里在windows11上跑,3060 8g卡,设置到16使用了6.22G,epochs从300开始如果没有出现过拟合则增加,反之减少,data选择我们新建的coco-person.yaml。weights对于移动部署选择YOLOv5s/m,云部署选择YOLOv5l/x
1 python train.py --img 640 --batch 16 --epochs 300 --data coco-person.yaml --weights yolov5l.pt
训练了一周,跑了250几轮,结果如下
使用测试集来测试
1 python val.py --weights D:\\ code\\ face\\ yolov5\\ runs\\ train\\ exp5\\ weights\\ best.pt --data coco-person.yaml --img 640
输出:
1
2
3
4
5
6
Model summary: 212 layers, 20852934 parameters, 0 gradients, 47 .9 GFLOPsval : Scanning D:\code\face\datasets\coco\val2017.cache... 4952 images, 48 backgrounds, 0 corrupt: 100 %|Class Images Instances P R mAP50 mAP50-95 : 100 %|████████all 5000 10777 0 .819 0 .742 0 .826 0 .591 Speed : 0 .2 ms pre-process, 6 .9 ms inference, 1 .0 ms NMS per image at shape (32 , 3 , 640 , 640 )Results saved to runs\val\exp3
对比下yolov5m.pt
1 python val.py --weights yolov5m.pt --data coco.yaml --img 640
输出
1
2
3
4
5
YOLOv5m summary: 290 layers, 21172173 parameters, 0 gradientsval : Scanning D:\code\face\datasets\coco\val2017.cache... 4952 images, 48 backgrounds, 0 corrupt: 100 %|Class Images Instances P R mAP50 mAP50-95 : 100 %|████████all 5000 10777 0 .828 0 .712 0 .809 0 .566 Speed : 0 .2 ms pre-process, 6 .4 ms inference, 2 .0 ms NMS per image at shape (32 , 3 , 640 , 640 )
对比下yolov5l.pt,输出
1
2
3
4
val : Scanning D:\code\face\datasets\coco\val2017.cache... 4952 images, 48 backgrounds, 0 corrupt: 100 %|Class Images Instances P R mAP50 mAP50-95 : 100 %|████████all 5000 10777 0 .844 0 .731 0 .828 0 .597 Speed : 0 .2 ms pre-process, 11 .8 ms inference, 1 .6 ms NMS per image at shape (32 , 3 , 640 , 640 )
然后实际测试测试
1 detect.py --weights ./runs/ train/exp5/ weights/best.pt --source http:/ /192.168.2.185:4747/ video
这边尝试了自己训练300轮的模型、yolov5l.pt、yolov5x.pt,对一张有20人的照片进行检测,分别检测出19、21、22个人。居然没一个对的。。。不过在人与人交叠不是很复杂的情况下,3个模型识别都没啥问题。
继续训练 当发生训练意外停止的状况,需要接着训练,可以修改修改train.py文件parse_opt函数中的resume默认值为True。然后执行
注意的是之前在yolov5\runs\train生成的expx最后一个要是中断那次的训练。
数据集 安装
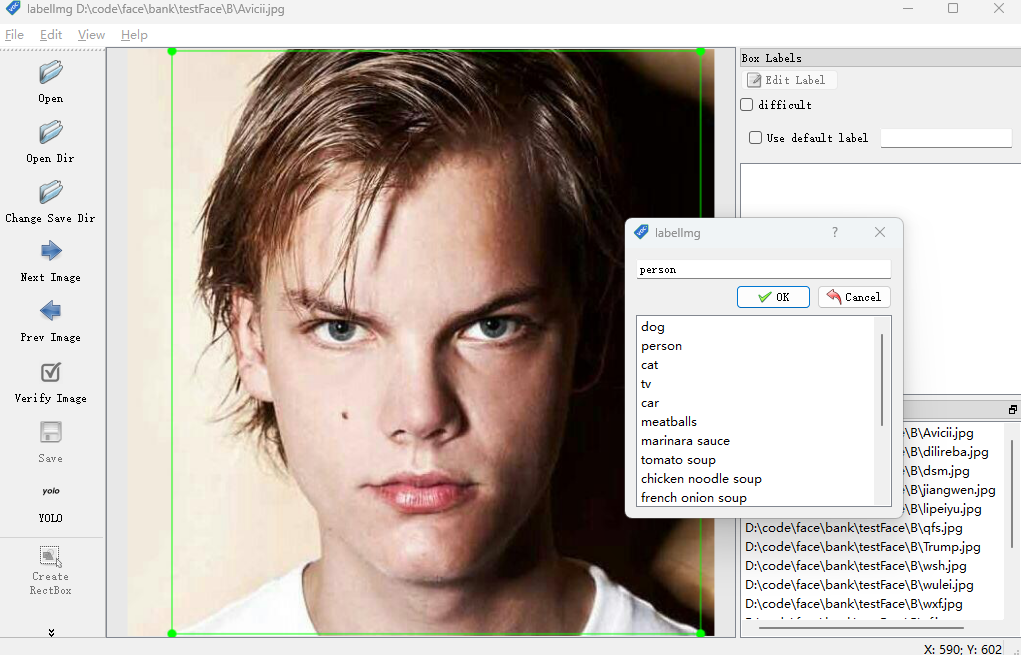
输入labelimg打开,仓库 exe
选择目标文件夹,选择处理后的文件夹,然后选择yolo。
在windows上保存的时候如果出现错误:
1 unknown encoding : cp65001
可以尝试在你的电脑中添加一个系统环境变量PYTHONIOENCODING,其值为UTF-8。
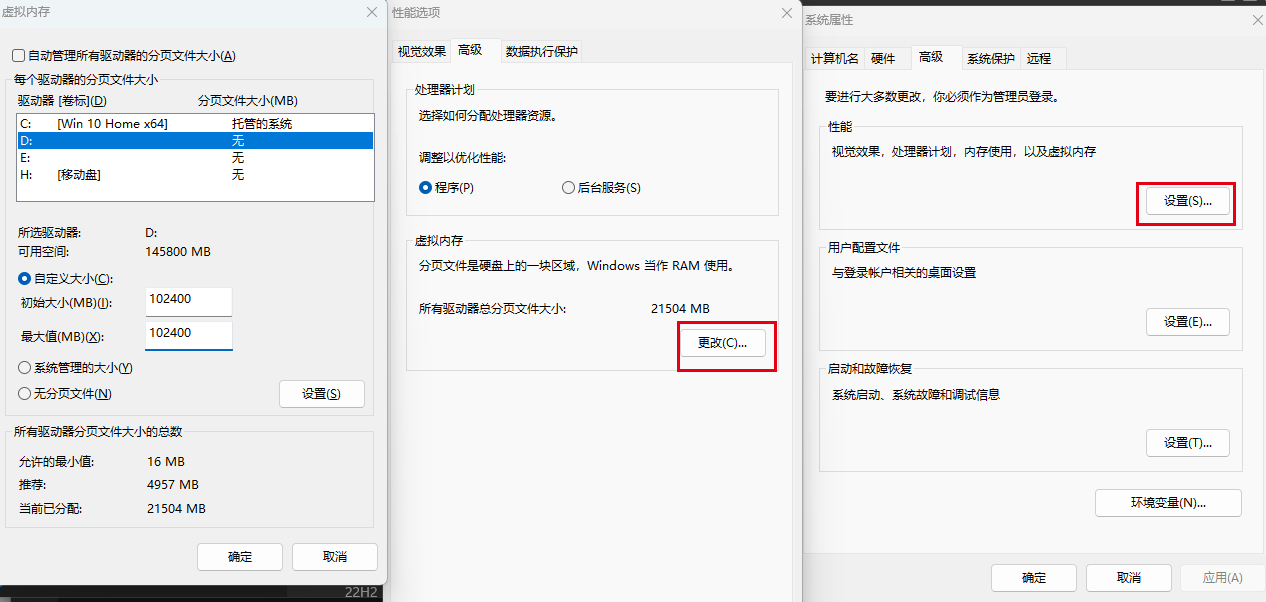
可能遇到的问题
OSError: [WinError 1455] 页面文件太小,无法完成操作
主要要先点设置再点确定,重启后生效。然后对应盘就会有个巨无霸文件
AttributeError: ‘Upsample’ object has no attribute ‘recompute_scale_factor’
1 D :\Anaconda3\envs\deep\Lib\site-packages\torch\nn\modules\upsampling.py
修改152行代码:
1
2
3
def forward (self , input: TensorTensor: return F.interpolate(input, self .size, self .scale_factor, self .mode, self .align_corners)
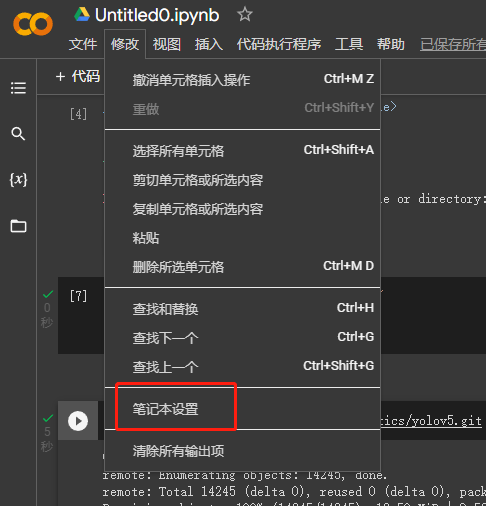
试用谷歌的colab进行训练 colab 是google推出的一个jupyter notebook工具,主要用于深度学习的研究和开发。
首先新建一个笔记本,然后点击修改->笔记本设置->选择GPU
然后点击右上方的连接,这里是连接后的显示
输入命令查看torch的版本
1 import torch torch.__version__
挂在云盘google drive,执行后会弹窗让你登录drive
1
2
from google.colab import drive'/content/drive' )
设置之后操作使用的目录,deep是在Drive根目录下的一个文件夹
1
2
3
path = "/content/drive/My Drive/deep" os .chdir(path )print (os .listdir(path ))
克隆yolov5,执行后可以在dirve/deep中看到
1 !git clone https://gi thub.com/ultralytics/y olov5.git
补充安装个包,yolov5执行时会检测requirements.txt
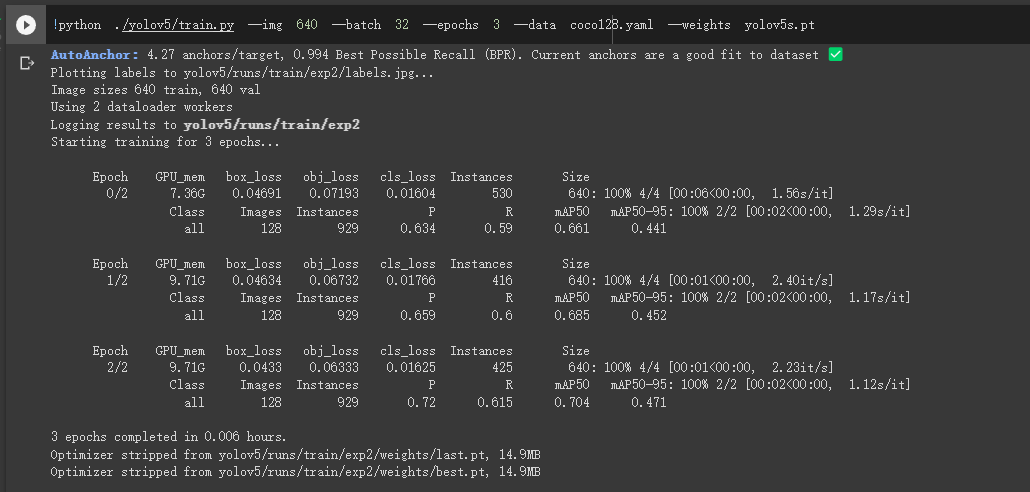
训练
1 python train.py --img 640 --batch 32 --epochs 3 --data coco128.yaml --weights yolov5s.pt