本文最后更新于 2026年4月17日 早上
最近在研究机器人,就涉及到OCR,我现在基本放弃自己学习了,设备性能不行,直接用别人的模型挺香的。最开始选择阿里魔塔的模型,但是特么检测和识别居然一个是tensorflow一个是pytorch,就无语,于是转头用paddle的试试。
windows环境 anconda 仍然是使用anconda,软件安装后
1
2
conda create -n paddle python=3 .10 activate paddle
paddle相关 官网找到对应自己的执行命令 ,我这里是windows下CUDA11.6,选择用pip和conda都行
1 python -m pip install paddlepaddle-gpu==2.4 .1 .post116 -f https:// www.paddlepaddle.org.cn/whl/ windows/mkl/ avx/stable.html
安装paddlehub
1 pip install --upgrade paddlehub -i https:
安装PaddleOCR
1 pip install "paddleocr>=2.0.1"
可能遇到的问题 No module named ‘lanms’
No module named ‘Polygon’
1 pip install Polygon3 -i https:// pypi.tuna.tsinghua.edu.cn/simple
No module named ‘shapely’
1 pip install shapely -i https:// pypi.tuna.tsinghua.edu.cn/simple
No module named ‘pyclipper’https://pypi.tuna.tsinghua.edu.cn/simple
AttributeError: module ‘numpy’ has no attribute ‘int’. Did you mean: ‘inf’?
ubuntu环境 安装anconda 1 wget https://mi rrors.bfsu.edu.cn/anaconda/ archive/Anaconda3-2022.10 -Linux-x86_64.sh
一路回车加yes,完成后执行
1
2
3
echo 'export PATH="/root/anaconda3/bin:$PATH"' >>~/.bashrcsource ~/.bashrc
退出终端重新进入
安装paddle环境 1 2 3 conda create -n paddle python=3.10 2.4 .1 --channel https://mi rrors.tuna.tsinghua.edu.cn/anaconda/ cloud/Paddle/ // pypi.tuna.tsinghua.edu.cn/simple
可能出现的问题 如果seqeval安装报错则先安装setuptools_scm
1 pip install setuptools_scm
No module named ‘skimage’
1 pip install scikit-image
No module named ‘imgaug’
1 conda install -c conda-forge imgaug
极简示例 这个示例是使用paddlehub加载ch_pp-ocrv3进行的检测与识别,该示例无需安装PaddleOCR
1 2 3 4 5 6 7 8 9 10 11 12 13 14 15 16 17 18 19 20 21 22 23 24 25 26 27 28 import paddlehub as hubname ="ch_pp-ocrv3" , enable_mkldnn =True ) images =np_images,use_gpu =True ,output_dir ='downloadTemp' ,visualization =False , # 是否将识别结果保存为图片文件;box_thresh =0.6, # 检测文本框置信度的阈值;text_thresh =0.5, # 识别中文文本置信度的阈值;angle_classification_thresh =0.9, # 文本角度分类置信度的阈值det_db_unclip_ratio =1.5) #设置检测框的大小for result in results:'data' ]for infomation in data:print ('text: ' , infomation['text' ], '\nconfidence: ' , infomation['confidence' ], '\ntext_box_position: ' , infomation['text_box_position' ])'text' ])print (test.detection("./test2.png" ))
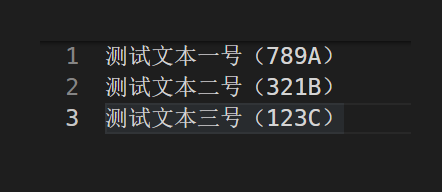
识别图是:
识别结果如下,我这里只保留了文本
1 ['测试文本一号(789A) ', '2 ', '测试文本二号(321B) ', '3 ', '测试文本三号(123C) ']
其他信息可以用如下代码打印
1 2 3 4 5 # for result in results:# data = result['data' ] # save_path = result['save_path' ] # for infomation in data: # print ('text: ' , infomation['text' ], '\nconfidence: ' , infomation['confidence' ], '\ntext_box_position: ' , infomation['text_box_position' ])
使用PaddleOCR来进行识别 需要安装PaddleOCR,然后直接执行命令
1 paddleocr --image_dir ./test2.png
图片就是上面极简示例那个,然后此命令执行后会自动下载
ch_PP-OCRv3_det_infer.tar 检测模型
ch_PP-OCRv3_rec_infer.tar 识别模型
ch_ppocr_mobile_v2.0_cls_infer.tar 文本方向分类模型
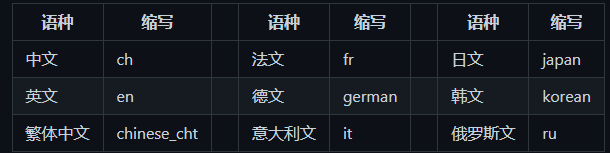
他支持多种语言,通过–lang=参数来指定,例如
1 paddleocr --image_dir ./test2.png --lang=ch
以下是官网给的类型表格,懒得敲直接截图
然后是在python上使用示例
1 2 3 4 5 6 7 8 9 10 11 from paddleocr import PaddleOCRTrue , lang="ch" ) True )for idx in range(len(result)): for line in res:
结果如下图
上面这种方式是直接调用pip安装的paddleocr,也就是源文件在D:\Anaconda3\envs\paddle\Lib\site-packages\paddleocr里。如果想要修改默认的模型就需要去这里改paddleocr.py文件,在第58行有模型的下载地址,52行有模型的存储地址。例如
1 2 3 4 5 'det ': {'ch ': {'url ':'https :
然后去模型库 复制想要使用的模型链接来替换这个即可
如果不想通过pip安装PaddleOCR,那么就克隆工程
1 git clone https://gi thub.com/PaddlePaddle/ PaddleOCR.git
然后安装环境
1 pip install -r requirements.txt
修改模型地址,不然执行后仍然安装到C盘的用户目录去咯。就是上面说的paddleocr.py的52行
1 BASE_DIR = os.path.expanduser("~/.paddleocr/" )
改成这个工程的目录
1 BASE_DIR = os.path.expanduser("./inference/" )
然后在paddleocr.py最后添加入口
1 2 if __name__ == "__main__" :main ()
最后执行
1 paddleocr --image_dir ./test2.png
模型就会被下载到PaddleOCR\inference\whl中
使用predict_system.py选择模型进行识别,这里来识别下日文
1 python tools/infer/predict_system.py --image_dir ="./doc/imgs/japan_1.jpg" --det_model_dir ="./inference/ch_ppocr_server_v2.0_det_infer" --rec_model_dir ="./inference/japan_PP-OCRv3_rec_infer" --rec_char_dict_path ="ppocr/utils/dict/japan_dict.txt" --vis_font_path ="doc/fonts/japan.ttf"
PaddleHub Serving的服务部署 这个有官方文档 ,可以直接去看,以下是我使用的记录
首先把工程克隆下来
1 git clone https://gi thub.com/PaddlePaddle/ PaddleOCR.git
进入仓库,新建inference文件夹,然后去模型库 下载模型:
检测模型,例如:ch_PP-OCRv4_det_server_infer,ch_PP-OCRv3_det_infer
识别模型,例如:ch_PP-OCRv4_rec_server_infer,ch_PP-OCRv3_rec_infer
文本方向分类模型,例如:ch_ppocr_mobile_v2.0_cls_infer
这里主要使用串联服务,代码路径是:PaddleOCR/deploy/hubserving/ocr_system,首先进入其中修改下上面模型的路径。
修改params.py,默认是使用三代模型,如果我们下载了最新的四代就需要修改下识别和检测模型的路径
1 2 cfg.det_model_dir = "./inference/ch_PP-OCRv4_det_server_infer/" "./inference/ch_PP-OCRv4_rec_server_infer/"
安装检测+识别串联服务模块,如果报错在上文中找
1 hub install deploy\hubserving\ocr_system\
启动服务
1 hub serving start -m ocr_system
输出
1 2 3 4 * Running on all addresses (0.0 .0.0 )on http://127.0 .0.1 :8866 on http://192.168 .2.137 :8866 2022 -12 -30 15 :28 :17 ,256 ] [ INFO] _internal.py :224 - Press CTRL+C to quit
接下来就是发个请求试一试,paddleOcr里面有个例程(tools/test_hubserving.py),但是单纯请求可以直接用下面代码
1 2 3 4 5 6 7 8 9 10 11 12 13 14 15 16 17 18 19 20 import requestsimport json import base64return base64.b64encode(image).decode('utf8' )open ("./test2.png", 'rb' ).read ()'images' : [cv2_to_base64(img)]}json .dumps(data))0 ]if __name__ == '__main__' :
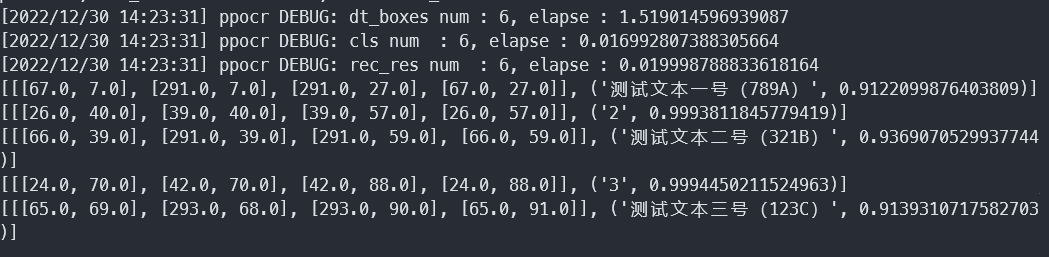
结果:
服务器打印信息
1 2 3 4 [2022/12/30 15:44:01] ppocr DEBUG: dt_boxes num : 6 , elapse : 0 .03400087356567383 [2022/12/30 15:44:01] ppocr DEBUG: cls num : 6 , elapse : 0 .05700230598449707 [2022/12/30 15:44:02] ppocr DEBUG: rec_res num : 6 , elapse : 0 .8120079040527344 [2022-12-30 15:44:02,251] [ INFO] _internal.py:224 - 127 .0 .0 .1 - - [30/Dec/2022 15:44:02] "POST /predict/ocr_system HTTP/1.1" 200 -
如果nohup来启动,则可以通过下列命令停止:
1 hub serving stop -p 8866
如果修改配置则需要先卸载模块
1 hub uninstall ocr_system
paddleOcr训练手写数字 下载数据集 执行下列程序,得到两位数手写数字
1 2 3 4 5 6 7 8 9 10 11 12 13 14 15 16 17 18 19 20 21 22 23 24 25 26 27 28 29 30 31 32 33 34 35 36 37 38 39 40 41 42 43 44 45 46 47 48 49 50 51 52 53 54 55 56 57 58 59 60 61 62 63 64 65 66 67 68 69 70 71 72 73 74 75 76 77 import cv2import random,osimport numpy as npfrom tqdm import tqdmfrom paddle.vision.datasets import MNISTmnist_train = MNIST(mode='train', backend='cv2')mnist_test = MNIST(mode='test', backend='cv2')if not os.path.exists("./dataset" ):os .makedirs("./dataset" )if not os.path.exists("./dataset/train" ):os .makedirs("./dataset/train" )if not os.path.exists("./dataset/test" ):os .makedirs("./dataset/test" )datas_train = {}for i in range(len(mnist_train)):sample = mnist_train[i]x , y = sample[0 ], sample[1 ]_sum = np.sum(x, axis=0 )_where = np.where(_sum > 0 )x = 255 - x[:, _where[0 ][0 ]: _where[0 ][-1 ]+1 ]if str(y[0 ]) in datas_train:datas_train [str(y[0 ])].append(x)else :datas_train [str(y[0 ])] = [x] datas_test = {}for i in range(len(mnist_test)):sample = mnist_test[i]x , y = sample[0 ], sample[1 ]_sum = np.sum(x, axis=0 )_where = np.where(_sum > 0 )x = 255 - x[:, _where[0 ][0 ]: _where[0 ][-1 ]+1 ]if str(y[0 ]) in datas_test:datas_test [str(y[0 ])].append(x)else :datas_test [str(y[0 ])] = [x] datas_train_list = [] for num in tqdm(range(0 , 99 )):for _ in range(100 ):imgs = [255 - np.zeros((28, np.random.randint(10)))] for word in str(num):index = np.random.randint(0 , len(datas_train[word]))imgs .append(datas_train[word][index])imgs .append(255 - np.zeros((28 , np.random.randint(10 ))))img = np.concatenate(imgs, 1 )cv2 .imwrite('dataset/train/%03 d_%04 d.jpg' % (num, _), img)datas_train_list .append('train/%03 d_%04 d.jpg\t%d\n' % (num, _, num))datas_test_list = [] for num in tqdm(range(0 , 99 )):for _ in range(50 ):imgs = [255 - np.zeros((28, np.random.randint(10)))] for word in str(num):index = np.random.randint(0 , len(datas_test[word]))imgs .append(datas_test[word][index])imgs .append(255 - np.zeros((28 , np.random.randint(10 ))))img = np.concatenate(imgs, 1 )cv2 .imwrite('dataset/test/%03 d_%04 d.jpg' % (num, _), img)datas_test_list .append('test/%03 d_%04 d.jpg\t%d\n' % (num, _, num))with open('dataset/train.txt', 'w') as f:for line in datas_train_list:f .write(line)with open('dataset/test.txt', 'w') as f:for line in datas_test_list:f .write(line)
环境 克隆paddleOcr仓库
1 git clone https://gi thub.com/PaddlePaddle/ PaddleOCR.git
下载个预训练模型 ,我这里选择了ch_ppocr_server_v2.0_rec
训练 建立识别分类字典number.txt,里面就是0~9个数字一行一个。
1 2 3 4 5 6 7 8 9 10 11 12 13 14 15 16 17 18 19 20 21 22 23 24 25 26 27 28 29 30 31 32 33 34 35 36 37 38 39 40 41 42 43 44 45 46 47 48 49 50 51 52 53 54 55 56 57 58 59 60 61 62 63 64 65 66 67 68 69 70 71 72 73 74 75 76 77 78 79 80 81 82 83 84 85 86 87 88 89 90 91 92 93 94 95 96 97 98 99 100 101 102 103 104 105 106 107 108 109 110 111 112 113 114 115 116 117 118 119 120 121 122 123 124 125 126 127 128 129 130 131 Global: use_gpu: true epoch_num: 100 log_smooth_window: 20 print_batch_step: 10 save_model_dir: D:\\code\\ggggg\\ocrTrain\\paddle\\PaddleOCR\\mnist\\out save_epoch_step: 1 eval_batch_step: [0 , 200 ]cal_metric_during_train: True pretrained_model: D:\\code\\ggggg\\ocrTrain\\paddle\\PaddleOCR\\pretrain_models\\ch_ppocr_server_v2.0_rec_pre\\best_accuracy checkpoints: save_inference_dir: use_visualdl: False infer_img: D:\\code\\ggggg\\ocrTrain\\paddle\\PaddleOCR\\mnist\\9_4.png character_dict_path: D:\\code\\ggggg\\ocrTrain\\paddle\\PaddleOCR\\mnist\\number.txt character_type: en max_text_length: 16 infer_mode: False use_space_char: False distort: True Optimizer: name: Adam beta1: 0.9 beta2: 0.999 lr: name: Cosine learning_rate: 0.001 regularizer: name: 'L2' factor: 0.00001 Architecture: model_type: rec algorithm: CRNN Transform: Backbone: name: MobileNetV3 scale: 0.5 model_name: small small_stride: [1 , 2 , 2 , 2 ]Neck: name: SequenceEncoder encoder_type: rnn hidden_size: 48 Head: name: CTCHead fc_decay: 0.00001 Loss: name: CTCLoss PostProcess: name: CTCLabelDecode Metric: name: RecMetric main_indicator: acc Train: dataset: name: SimpleDataSet data_dir: D:\\code\\ggggg\\ocrTrain\\paddle\\dataset\\ label_file_list: ["D:\\code\\ggggg\\ocrTrain\\paddle\\dataset\\train.txt" ]transforms: - DecodeImage: img_mode: BGR channel_first: False - RecAug: - CTCLabelEncode: - RecResizeImg: image_shape: [3 , 28 , 64 ]- KeepKeys: keep_keys: ['image' , 'label' , 'length' ] loader: shuffle: True batch_size_per_card: 256 drop_last: True num_workers: 0 Eval: dataset: name: SimpleDataSet data_dir: D:\\code\\ggggg\\ocrTrain\\paddle\\dataset\\ label_file_list: ["D:\\code\\ggggg\\ocrTrain\\paddle\\dataset\\test.txt" ]transforms: - DecodeImage: img_mode: BGR channel_first: False - CTCLabelEncode: - RecResizeImg: image_shape: [3 , 28 , 64 ]- KeepKeys: keep_keys: ['image' , 'label' , 'length' ] loader: shuffle: False drop_last: False batch_size_per_card: 256 num_workers: 0
进行训练,先训练100轮
1 (paddle) D :\code\ggggg\ocrTrain\paddle\PaddleOCR\mnist>python ../tools/train.py -c ./mnist.yml
继续训练
1 python ../tools/ train.py -c ./mnist.yml -o Global.checkpoints=./y our/trained/m odel
评估与测试 评估
1 python ../tools/ eval.py -c ./mnist.yml -o Global.pretrained_model=./ out/best_accuracy
直接对图片进行识别
1 python .. /tools/infer_rec.py -c mnist.yml -o Global.pretrained_model =./out/best_accuracy Global.load_static_weights =false Global.infer_img =5.png
结果
1 2 3 4 [2023 /02/ 01 14 :49 :53 ] ppocr INFO: load pretrain successful from ./out/ best_accuracy2023 /02/ 01 14 :49 :53 ] ppocr INFO: infer_img: 5 .png2023 /02/ 01 14 :49 :55 ] ppocr INFO: result: 5 0.989963948726654 2023 /02/ 01 14 :49 :55 ] ppocr INFO: success!
转化为inferencre模型 使用tools/export_model.py工具
1 python ../tools/ export_model.py -c ./mnist.yml -o Global.pretrained_model=./ out/best_accuracy Global.load_static_weights=False Global.save_inference_dir=./i nference/mnist
会得到三个文件
inference.pdiparams
inference.pdiparams.info
inference.pdmodel
可以用这个直接试试
1 python .. /tools/infer/predict_rec.py --image_dir ="5.png" --rec_model_dir ="../inference/whl/rec/hw/ch_ppocr_server_v2.0_rec_pre_hw" --rec_char_dict_path ="./number.txt" --use_space_char =False --enable_mkldnn =False --rec_image_shape ="3, 28,64"
这里注意要将rec_image_shape设置成训练时约定的大小,否则结果是可能会和转化前测试结果不同的。还有就是这个模型没法识别透明背景的图
结果
1 [2023 /02/ 01 15 :17 :23 ] ppocr INFO: Predicts of 5 .png:('5' , 0.989963948726654 )
将新模型加入到paddleocr中 编辑paddleocr.py,先将识别模型存储地址修改
1 2 # BASE_DIR = os .path .expanduser("~/.paddleocr/" )os .path .expanduser("./inference/" )
给MODEL_URLS中的’rec’添加一个
1 2 3 4 5 'hw': {
然后将模型放入下列文件夹中
1 PaddleOCR\inference\whl\rec\hw\ch_ppocr_server_v2.0 _rec_pre_hw
还是由于上述原因,需要修改rec_image_shape,再paddleocr.py中找到这儿,改成3,28,64
1 2 if params .ocr_version == 'PP-OCRv3' :params .rec_image_shape = "3, 48, 320"
识别
1 2 3 4 5 6 from paddleocr import PaddleOCRif __name__ == "__main__" :use_angle_cls =False , use_gpu =True , lang ="hw" )"./mnist/5.png" det =False , cls =False )print (result)
结果
1 [[('5', 0.989963948726654)]]
图片透明部分变为白色 不得不再次感叹,copilot的厉害,自动提示出来的
1 2 3 image = cv2.imread("5_4.png" ,-1 )image [image[:,:,3 ]==0 ] = [255,255,255,255] cv2 .imwrite("5_4__1.png" ,image)
下面是我之前的方式
1 2 3 4 5 6 7 8 9 10 11 12 13 14 15 16 17 18 19 20 21 22 23 24 25 26 27 28 29 30 31 32 33 34 35 36 37 38 39 40 import cv2import osimport numpy as npdef transparence2white (img ):if (len (img[0 ,0 ]) < 4 ):return None for height in range (img.shape[1 ]):for width in range (img.shape[0 ]):if (point[3 ] == 0 ): 255 ,255 ,255 ,255 ] return imgdef changeImgTransparence2white (imgPath,savePath = None ):try :if os.path.exists(imgPath):1 ) if (type (transparence2white(img)) is not np.ndarray):print ("图片不是RGBA" )return False else :if savePath != None :print (savePath)else :"./" ,os.path.splitext(imgPath)[0 ] + "_1" + os.path.splitext(imgPath)[1 ])return True else :print ("图标不存在" )return False except Exception as ex:print ("其他异常:{}" .format (ex))if __name__ == '__main__' :print (changeImgTransparence2white("5_4.png" ))
RGBA转RGB 也即32深度变成24
1 2 3 img = cv2.imread ("5_4.png" ,-1 )img = cv2.cvtColor (img ,cv2.COLOR_RGBA2RGB).imwrite ("5_4__2.png" ,img)