YOLO11答题卡题型区域识别

本文最后更新于 2025年5月27日 凌晨

本文介绍了如何使用YOLO11模型对考试答题卡进行题型区域识别,包括数据集制作、模型训练和模型部署全流程。

制作训练集

在官网文档中给出了几个标注工具,这里选择label studio进行。

安装label-studio

label-studio有多个安装方式,这里选择最方便的docker。如果要使用windows则照着仓库README进行安装。

1
2
3
docker pull heartexlabs/label-studio:latest

docker run -d --name label-studio -e DATA_UPLOAD_MAX_NUMBER_FILES=2000 -p 30007:8080 -v $(pwd)/mydata:/label-studio/data heartexlabs/label-studio:latest

映射的mydata文件夹用于保存生成内容。运行后,通过IP:30007进入web界面。

使用label-studio

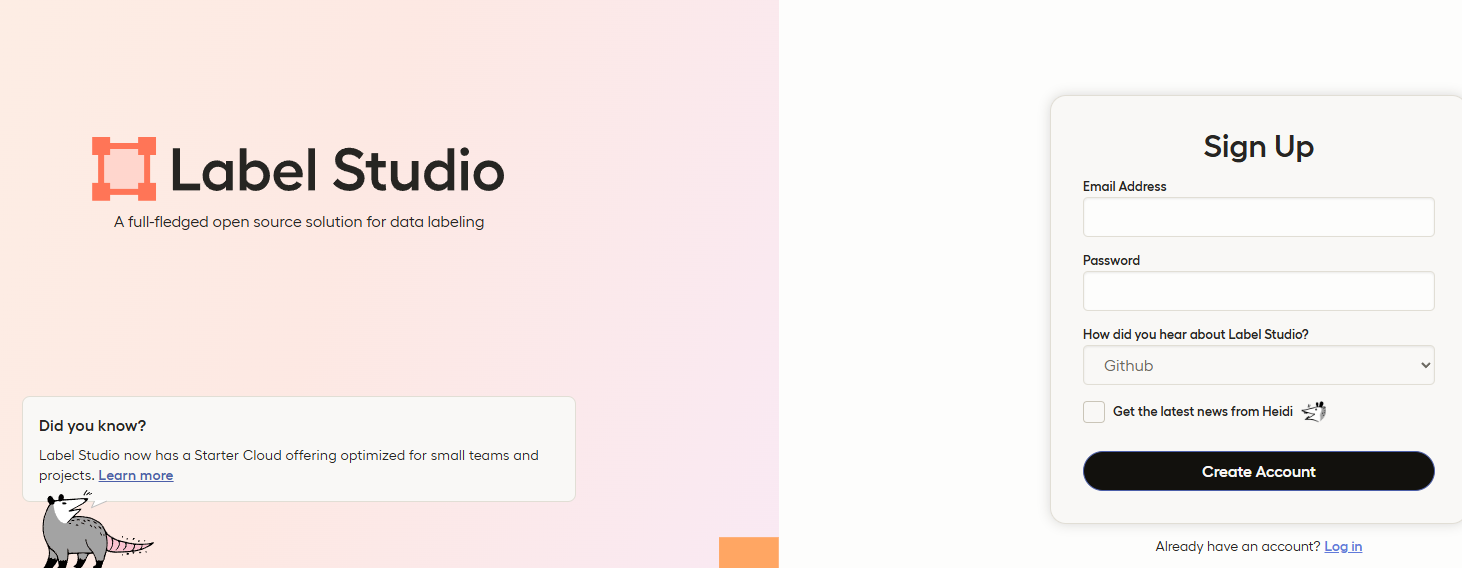
首次登录需要注册账号

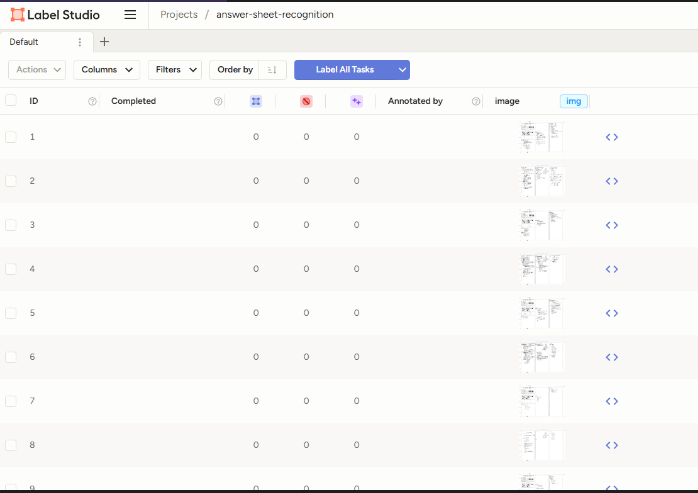
我的最终目标是对考试答题卡进行题型拆分。首先先创建一个项目

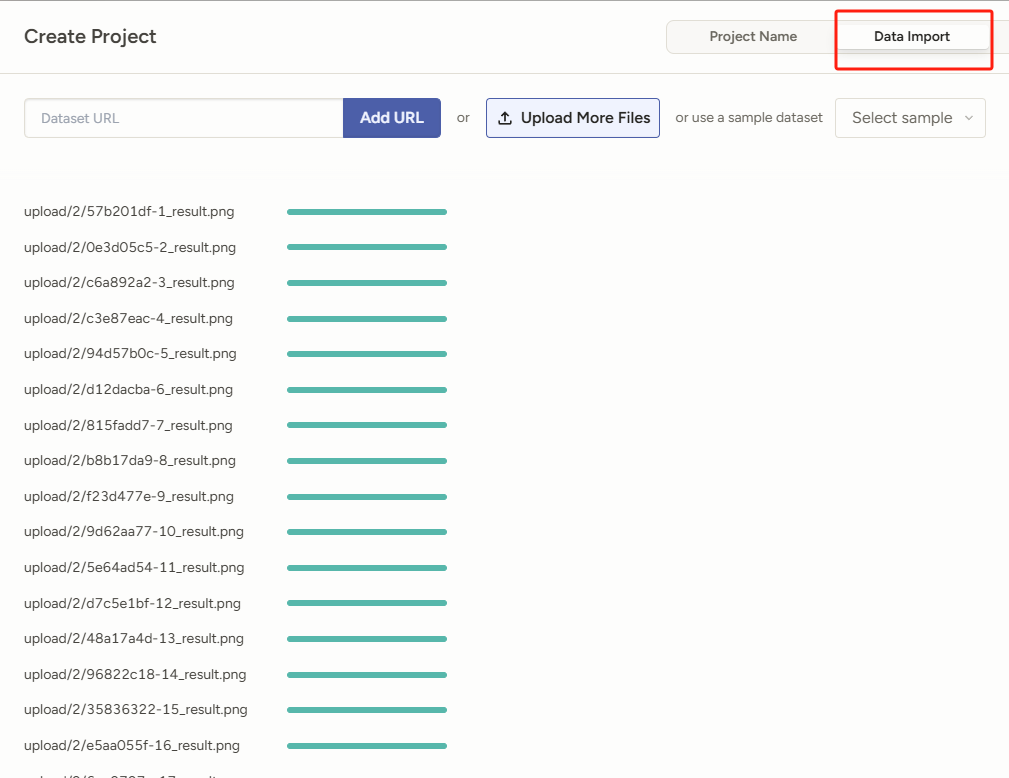
点击第二个标签,上传图片。对于原始图片数据,应该避免数据收集中的偏见,比如我这儿要识别选择题,但是数据来源全都是数学考试中的选择题,那么就会产生偏差,导致对其他科目识别效果不佳。所以最后收集不同学科,不同考试,或者不同学校的不同设计。

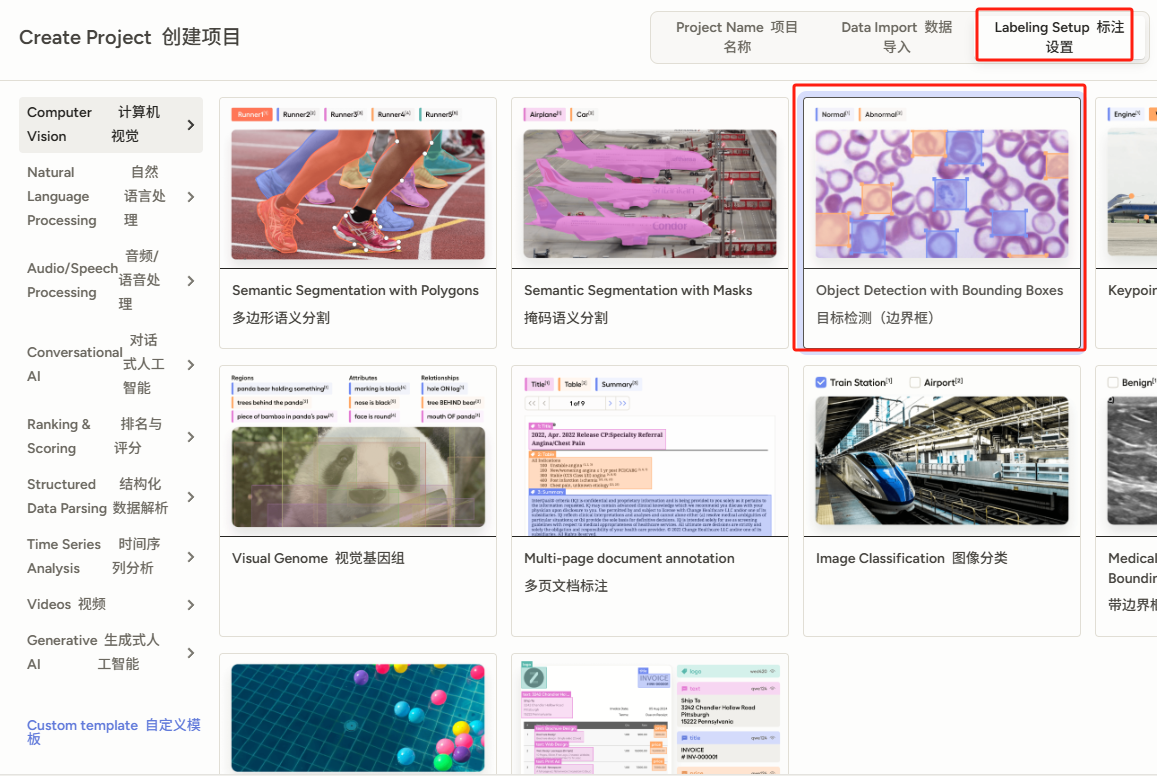
点击第三个标签选择模板,根据我的需求,点击目标检测

在进入的子页面,中添加分类,可以点击创建好的标签,修改颜色以便区分。

最后点击右上角SAVE完成工程创建。

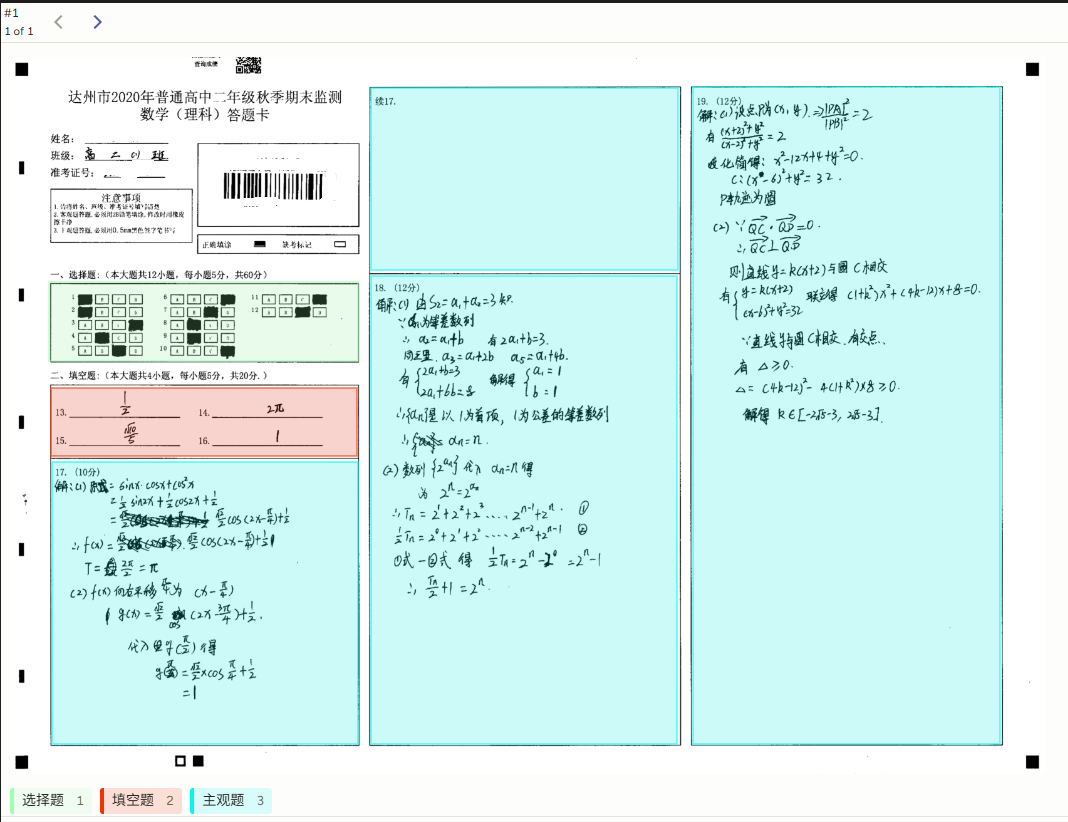
点击Label All Tasks按钮开始标注。点击左下角选择标签,然后在途中拉框。也可以拉好框,然后点击标签切换。

完成后点击submit,会自动跳转到下一张图片,继续标注。
完成标注后,点击导出,选择yolo with Images,下载后压缩包内容:

1
2
3
4
/labels  保存了每张图片的标注信息
/iamges 图片源文件
notes.json 项目信息
classes.txt 类别

之后官方文档将数据分为训练和测试:

1
2
3
4
5
6
7
dataset/
├── train/
│ ├── images/
│ └── labels/
└── val/
├── images/
└── labels/

常见的拆分方法是 70% 用于训练,20% 用于验证,10% 用于测试。最后这个测试就是训练完后自己来看看效果,和训练没关系。我这儿图片本身就不多,就直接分成两类。最终使用了300张训练数据和40张验证数据。

然后编写配置文件放在数据根目录

1
2
3
4
5
6
7
8
9
# data.yaml
train: ./train
val: ./val
nc: 4
names:
- "主观题"
- "作文"
- "填空题"
- "选择题"

数据分割工具

用于将从label studio导出的总数据,通过该工具分割成训练、验证和测试。

1
2
3
4
5
6
7
8
9
10
11
12
13
14
15
16
17
18
19
20
21
22
23
24
25
26
27
28
29
30
31
32
33
34
35
36
37
38
39
40
41
42
43
44
45
46
47
48
49
50
51
52
53
54
55
56
57
58
59
60
61
62
63
64
65
66
67
68
69
70
71
72
73
74
75
76
77
78
79
80
81
82
83
84
85
86
87
88
89
90
91
92
93
94
95
96
97
98
99
100
101
102
103
104
105
106
107
108
109
110
111
112
113
114
115
116
117
118
119
120
121
122
123
124
125
126
127
128
129
130
131
132
133
134
135
136
137
138
139
140
141
142
143
144
145
146
147
148
149
150
151
152
153
154
155
156
157
158
159
160
161
162
163
164
165
166
167
168
169
170
171
172
173
174
175
176
177
178
179
180
181
182
183
184
185
186
187
188
189
190
191
192
"""
数据集分割工具
将 Label Studio 导出的数据集分割为 train/val/test
"""

import os
import shutil
import random
import argparse
from pathlib import Path
import yaml
from typing import List, Tuple


def read_classes(classes_file: str) -> List[str]:
with open(classes_file, 'r', encoding='utf-8') as f:
classes = [line.strip() for line in f.readlines() if line.strip()]
return classes


def get_image_label_pairs(images_dir: str, labels_dir: str) -> List[Tuple[str, str]]:
pairs = []

for img_file in os.listdir(images_dir):
if img_file.lower().endswith(('.png', '.jpg', '.jpeg')):
img_path = os.path.join(images_dir, img_file)
# 对应的标签文件
label_file = os.path.splitext(img_file)[0] + '.txt'
label_path = os.path.join(labels_dir, label_file)

# 只有当标签文件存在时才添加
if os.path.exists(label_path):
pairs.append((img_path, label_path))
else:
print(f"警告: 图片 {img_file} 没有对应的标签文件")

return pairs


def split_dataset(pairs: List[Tuple[str, str]], train_ratio: float = 0.7,
val_ratio: float = 0.2, test_ratio: float = 0.1) -> Tuple[List, List, List]:
"""分割数据集"""
# 验证比例
total_ratio = train_ratio + val_ratio + test_ratio
if abs(total_ratio - 1.0) > 1e-6:
raise ValueError(f"比例总和必须为1.0,当前为 {total_ratio}")

# 随机打乱
random.shuffle(pairs)

total_count = len(pairs)
train_count = int(total_count * train_ratio)
val_count = int(total_count * val_ratio)

train_pairs = pairs[:train_count]
val_pairs = pairs[train_count:train_count + val_count]
test_pairs = pairs[train_count + val_count:]

return train_pairs, val_pairs, test_pairs


def copy_files(pairs: List[Tuple[str, str]], output_dir: str):
"""复制文件到目标目录"""
images_dir = os.path.join(output_dir, 'images')
labels_dir = os.path.join(output_dir, 'labels')

os.makedirs(images_dir, exist_ok=True)
os.makedirs(labels_dir, exist_ok=True)

for img_path, label_path in pairs:
# 复制图片
img_name = os.path.basename(img_path)
shutil.copy2(img_path, os.path.join(images_dir, img_name))

# 复制标签
label_name = os.path.basename(label_path)
shutil.copy2(label_path, os.path.join(labels_dir, label_name))


def create_data_yaml(output_dir: str, classes: List[str]):
"""创建data.yaml配置文件"""
data_config = {
'train': './train',
'val': './val',
'nc': len(classes),
'names': classes
}

yaml_path = os.path.join(output_dir, 'data.yaml')
with open(yaml_path, 'w', encoding='utf-8') as f:
yaml.dump(data_config, f, default_flow_style=False, allow_unicode=True)

print(f"已创建配置文件: {yaml_path}")


def main():
parser = argparse.ArgumentParser(description='数据集分割工具')
parser.add_argument('--input_dir', type=str,
default='dataset/question_recognition_label_studio',
help='输入目录路径 (默认: dataset/question_recognition_label_studio)')
parser.add_argument('--output_name', type=str,
default='question_recognition',
help='输出数据集名称 (默认: question_recognition)')
parser.add_argument('--train_ratio', type=float, default=0.7,
help='训练集比例 (默认: 0.7)')
parser.add_argument('--val_ratio', type=float, default=0.2,
help='验证集比例 (默认: 0.2)')
parser.add_argument('--test_ratio', type=float, default=0.1,
help='测试集比例 (默认: 0.1)')
parser.add_argument('--seed', type=int, default=42,
help='随机种子 (默认: 42)')

args = parser.parse_args()

# 设置随机种子
random.seed(args.seed)

# 检查输入目录
input_dir = Path(args.input_dir)
if not input_dir.exists():
print(f"错误: 输入目录不存在: {input_dir}")
return

images_dir = input_dir / 'images'
labels_dir = input_dir / 'labels'
classes_file = input_dir / 'classes.txt'

if not images_dir.exists():
print(f"错误: 图片目录不存在: {images_dir}")
return

if not labels_dir.exists():
print(f"错误: 标签目录不存在: {labels_dir}")
return

if not classes_file.exists():
print(f"错误: 类别文件不存在: {classes_file}")
return

# 读取类别
classes = read_classes(str(classes_file))
print(f"检测到 {len(classes)} 个类别: {classes}")

# 获取图片标签对
pairs = get_image_label_pairs(str(images_dir), str(labels_dir))
print(f"找到 {len(pairs)} 个有效的图片-标签对")

if len(pairs) == 0:
print("错误: 没有找到有效的图片-标签对")
return

# 分割数据集
train_pairs, val_pairs, test_pairs = split_dataset(
pairs, args.train_ratio, args.val_ratio, args.test_ratio
)

print(f"数据集分割结果:")
print(f" 训练集: {len(train_pairs)} 个样本 ({len(train_pairs)/len(pairs)*100:.1f}%)")
print(f" 验证集: {len(val_pairs)} 个样本 ({len(val_pairs)/len(pairs)*100:.1f}%)")
print(f" 测试集: {len(test_pairs)} 个样本 ({len(test_pairs)/len(pairs)*100:.1f}%)")

# 创建输出目录
output_dir = Path('dataset') / args.output_name
output_dir.mkdir(parents=True, exist_ok=True)

# 复制文件
print("正在复制文件...")
copy_files(train_pairs, str(output_dir / 'train'))
copy_files(val_pairs, str(output_dir / 'val'))
copy_files(test_pairs, str(output_dir / 'test'))

# 创建data.yaml
create_data_yaml(str(output_dir), classes)

print(f"数据集分割完成! 输出目录: {output_dir}")
print(f"目录结构:")
print(f" {output_dir}/")
print(f" ├── train/")
print(f" │ ├── images/ ({len(train_pairs)} 张图片)")
print(f" │ └── labels/ ({len(train_pairs)} 个标签)")
print(f" ├── val/")
print(f" │ ├── images/ ({len(val_pairs)} 张图片)")
print(f" │ └── labels/ ({len(val_pairs)} 个标签)")
print(f" ├── test/")
print(f" │ ├── images/ ({len(test_pairs)} 张图片)")
print(f" │ └── labels/ ({len(test_pairs)} 个标签)")
print(f" └── data.yaml")


if __name__ == '__main__':
main()

使用:

1
2
3
4
5
6
7
8
9
10
11
12
13
14
15
16
17
18
19
20
21
22
23
python splitting.py --input_dir .\question_recognition_label_studio

检测到 1 个类别: ['试题']
找到 110 个有效的图片-标签对
数据集分割结果:
训练集: 77 个样本 (70.0%)
验证集: 22 个样本 (20.0%)
测试集: 11 个样本 (10.0%)
正在复制文件...
已创建配置文件: dataset\question_recognition\data.yaml
数据集分割完成! 输出目录: dataset\question_recognition
目录结构:
dataset\question_recognition/
├── train/
│ ├── images/ (77 张图片)
│ └── labels/ (77 个标签)
├── val/
│ ├── images/ (22 张图片)
│ └── labels/ (22 个标签)
├── test/
│ ├── images/ (11 张图片)
│ └── labels/ (11 个标签)
└── data.yaml

YOLO11训练模型

环境:

1
2
3
4
5
6
mamba create yolo python=3.10
mamba activate yolo

pip install torch torchvision torchaudio --index-url https://download.pytorch.org/whl/cu118

pip install ultralytics

训练脚本:

这个示例基本是默认参数,如果需要修改,见后文对参数的描述。

1
2
3
4
5
6
7
8
9
10
11
12
13
14
15
16
17
18
19
20
21
from ultralytics import YOLO

def train():
model = YOLO('yolo11n.pt')

# 开始训练
model.train(
data='/home/server/AI/dataset/answer_card/data.yaml', # 数据集配置文件路径
epochs=100, # 训练轮数
batch=16, # 批次大小
imgsz=640, # 输入图片大小
workers=4, # 数据加载器的工作线程数
project='runs/train', # 训练结果保存目录
name='answer_sheet_recognition_model', # 本次训练的名称
optimizer='SGD', # 优化器,可选'Adam', 'AdamW', 'SGD'
device=0, # 设备,0表示使用GPU 0,'cpu'表示使用CPU
val=True, # 是否在每个epoch之后进行验证
)

if __name__ == '__main__':
train()

结果模型就保存在:runs/train/answer_sheet_recognition_model2中的weights

  • 预训练模型
    YOLO11为物体检测、分割和姿态估计提供了各种预训练模型。这里使用了最小的YOLO11n,可以在文档中查看其他。如果自动下载不了,也可以手动下载模型,扔到训练脚本同级目录。

  • imgsz
    定了输入到模型的图片分辨率,默认一般是640,训练时,模型会把你的原始图片resize到imgsz×imgsz。这个值越大,则越消耗显存,训练时间也越长,所以不是和原图一样大越好。还有就是,可以传入int或者list,比如imgsz=[1024, 1536],

  • rect
    当输入图像大小不一的时候,就将它设置成true,训练时会自动根据图片的原始宽高比例,调整输入图片的尺寸。能更好地利用原图信息,减少目标变形,提升检测精度。但是注意,它不支持多卡训练。

  • batch
    越大则速度越快,但是显存消耗越大。可以设置成-1,使其自动调节

  • amp
    可加快训练速度并减少内存使用量,同时不影响模型 精确度。默认是开着的,也是为什么你指定了更大预训练模型还再下载yolo11n.pt,因为需要这个小模型来计算。

  • epochs
    一般初始300,没有过拟合就成倍的加,降低损失。判断过拟合就是模型在训练集上表现很好(损失很低、准确率很高),但在验证集或测试集上表现变差(损失高、准确率低)。可以通过最后训练结果的results.png图片来看:

    • train/box_loss:训练集的定位损失
    • val/box_loss:验证集的定位损失
    • train/cls_loss:训练集的分类损失
    • val/cls_loss:验证集的分类损失

    如果训练损失(train_loss)持续下降,但验证损失(val_loss)停止下降甚至上升,就有过拟合的风险。
    如果训练mAP持续上升,而验证mAP停滞或下降,也可能过拟合。

  • optimizer
    优化器,包括 SGD、Adam、AdamW、NAdam、RAdam 和 RMSProp,也可以将其设置为 auto 以根据模型配置进行自动选择。

  • lr0
    较小的学习率提供更细致的调整,但收敛速度较慢。对于SGD优化器,初始值为0.01 ,对于Adam优化器,初始值为 0.001

测试模型

示例代码:

1
2
3
4
5
6
7
8
9
10
11
12
13
14
15
16
17
18
19
20
21
22
23
24
25
26
27
28
29
30
31
32
33
34
35
36
37
38
39
40
41
42
43
44
45
46
47
48
49
50
51
52
53
54
55
56
57
58
59
60
61
62
63
64
65
66
67
68
69
70
71
72
73
74
75
76
77
78
79
80
81
82
83
84
85
86
87
88
89
90
91
92
93
94
95
96
97
98
99
100
101
102
103
104
105
106
107
from ultralytics import YOLO
import cv2
from PIL import Image, ImageDraw, ImageFont
import numpy as np
import os
import argparse
from pathlib import Path

def detect_and_draw(source_path, output_dir='./output'):
os.makedirs(output_dir, exist_ok=True)
model = YOLO('./weights/best.pt')
class_names = ["主观题","作文","填空题","选择题"]
class_colors = [
(255, 0, 0),
(0, 255, 0),
(0, 0, 255),
(128, 0, 128)
]

font_size = 36
try:
font_path = 'C:/Windows/Fonts/SimHei.ttf'
font = ImageFont.truetype(font_path, font_size, encoding='utf-8')
except OSError:
font_path = 'C:/Windows/Fonts/msyh.ttc'
font = ImageFont.truetype(font_path, font_size, encoding='utf-8')

source_path = Path(source_path)

# 如果是目录,获取所有图片文件
if source_path.is_dir():
image_paths = list(source_path.glob('*.jpg')) + list(source_path.glob('*.png')) + list(source_path.glob('*.jpeg'))
else:
image_paths = [source_path]

for image_path in image_paths:
print(f"处理图片: {image_path}")
img = cv2.imread(str(image_path))
if img is None:
print(f"无法读取图片: {image_path}")
continue

img_rgb = cv2.cvtColor(img, cv2.COLOR_BGR2RGB)

results = model.predict(
source=img_rgb,
conf=0.25,
iou=0.45,
max_det=1000,
device='cpu'
)

for result in results:
boxes = result.boxes
if boxes is not None and len(boxes) > 0:
img_pil = Image.fromarray(img_rgb)
draw = ImageDraw.Draw(img_pil)

for box in boxes:
cls_id = int(box.cls[0])
conf = float(box.conf[0])
xyxy = box.xyxy[0].cpu().numpy()

color = class_colors[cls_id]

draw.rectangle(
[(xyxy[0], xyxy[1]), (xyxy[2], xyxy[3])],
outline=color,
width=3
)

label = f'{class_names[cls_id]} {conf:.2f}'

try:
text_size = font.getsize(label)
except AttributeError:
text_size = font.getbbox(label)[2:4]

text_origin = (xyxy[0], xyxy[1] - text_size[1] - 2 if xyxy[1] - text_size[1] - 2 > 0 else xyxy[1])

draw.rectangle(
[text_origin, (text_origin[0] + text_size[0], text_origin[1] + text_size[1])],
fill=color
)

draw.text(
text_origin,
label,
fill='white',
font=font
)

# 保存到output目录,保持原文件名
output_filename = f"{output_dir}/{image_path.stem}_result{image_path.suffix}"
img_result = cv2.cvtColor(np.array(img_pil), cv2.COLOR_RGB2BGR)
cv2.imwrite(output_filename, img_result)
print(f"已保存结果到: {output_filename}")

def parse_args():
parser = argparse.ArgumentParser(description='使用YOLO模型检测并标注图片')
parser.add_argument('--source', type=str, required=True, help='输入图片路径或包含图片的文件夹路径')
parser.add_argument('--output', type=str, default='./output', help='输出文件夹路径,默认为./output')
return parser.parse_args()

if __name__ == '__main__':
args = parse_args()
detect_and_draw(args.source, args.output)

使用示例:

1
2
python detect_clean.py --source test/image.jpg
python detect_clean.py --source test/

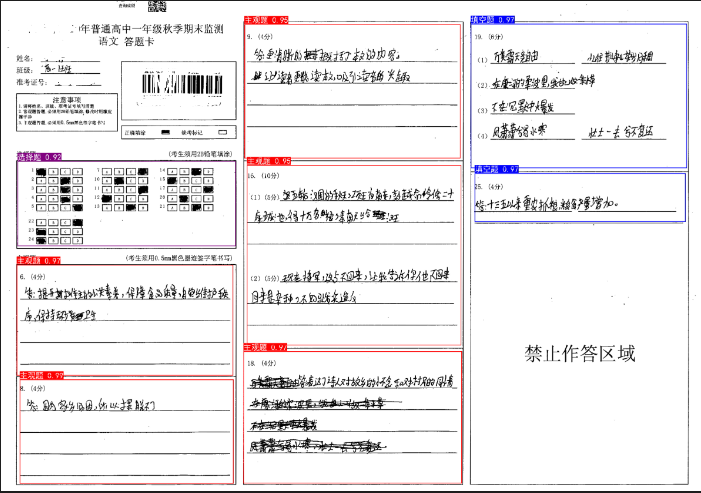
识别效果:

将其转化成ONNX

ONNX(Open Neural Network Exchange) 是一个开放格式,可以让你在不同的深度学习框架之间互操作。转成ONNX主要有以下好处:

  1. 跨平台兼容性:ONNX Runtime 支持多种平台,如 Windows、macOS 和 Linux,确保您的模型在不同环境中顺利运行。
  2. 硬件加速:ONNX Runtime 可以利用针对 CPU、GPU 和专用加速器的硬件优化,提供高性能推理。
  3. 框架互操作性:在流行框架如 PyTorch 或 TensorFlow 中训练的模型可以轻松转换为 ONNX 格式,并使用 ONNX Runtime 运行。
  4. 性能优化:与原生 PyTorch 模型相比,ONNX Runtime 可提供高达 3 倍的 CPU 加速,非常适合 GPU 资源有限的部署场景。

直接用yolo导出:

1
yolo export model=./weights/best.pt format=onnx

导出模型被保存在输入模型同级目录

1
2
3
4
5
6
7
8
9
10
11
12
13
14
15
Ultralytics 8.3.140  Python-3.10.17 torch-2.7.0+cu118 CPU (11th Gen Intel Core(TM) i7-11700 2.50GHz)
YOLO11n summary (fused): 100 layers, 2,582,932 parameters, 0 gradients, 6.3 GFLOPs

PyTorch: starting from 'weights\best.pt' with input shape (1, 3, 640, 640) BCHW and output shape(s) (1, 8, 8400) (5.2 MB)

ONNX: starting export with onnx 1.17.0 opset 19...
ONNX: slimming with onnxslim 0.1.53...
ONNX: export success 2.4s, saved as 'weights\best.onnx' (10.1 MB)

Export complete (3.1s)
Results saved to D:\code\yolo\weights
Predict: yolo predict task=detect model=weights\best.onnx imgsz=640
Validate: yolo val task=detect model=weights\best.onnx imgsz=640 data=/home/server/AI/dataset/answer_card/data.yaml
Visualize: https://netron.app
Learn more at https://docs.ultralytics.com/modes/export

YOLO ONNX推理

环境准备

1
2
3
pip install onnxruntime
# 如果需要GPU加速,可安装
pip install onnxruntime-gpu

核心流程

  1. 初始化阶段 (__init__和_initialize_model)
    设置模型参数(置信度阈值、NMS阈值等)
    根据 use_gpu 参数选择合适的执行提供程序(CUDA/CPU)
    加载ONNX模型
    从模型元数据中提取输入尺寸和类别名称
  2. 元数据加载 (_load_metadata)
    从ONNX模型的元数据中获取关键信息
    提取输入图像尺寸 (imgsz)
    提取类别名称映射 (names)
  3. 图像预处理 (_preprocess_image)
    验证输入图像格式
    调整图像尺寸至模型要求
    归一化像素值至[0,1]区间
    调整通道顺序为CxHxW(模型需要)
    添加批次维度
    计算缩放因子(用于后续还原坐标)
  4. 模型推理 (_run_inference)
    使用ONNXRuntime执行推理
    获取原始预测结果
  5. 预测结果处理 (_extract_prediction_data)
    从原始输出中提取边界框数据(x_center, y_center, width, height)
    提取类别分数信息
  6. 非极大值抑制 (_apply_nms和_suppress_overlapping_detections)
    找出每个检测的最高得分类别
    根据置信度降序排序
    应用NMS算法消除重叠框
    通过计算IoU(交并比)判断是否抑制冗余框
    根据类别过滤和置信度阈值过滤结果
  7. 检测接口 (detect)
    作为对外主要API,封装整个检测流程
    依次调用验证、预处理、推理和后处理等步骤
    返回处理后的检测结果列表

封装代码

1
2
3
4
5
6
7
8
9
10
11
12
13
14
15
16
17
18
19
20
21
22
23
24
25
26
27
28
29
30
31
32
33
34
35
36
37
38
39
40
41
42
43
44
45
46
47
48
49
50
51
52
53
54
55
56
57
58
59
60
61
62
63
64
65
66
67
68
69
70
71
72
73
74
75
76
77
78
79
80
81
82
83
84
85
86
87
88
89
90
91
92
93
94
95
96
97
98
99
100
101
102
103
104
105
106
107
108
109
110
111
112
113
114
115
116
117
118
119
120
121
122
123
124
125
126
127
128
129
130
131
132
133
134
135
136
137
138
139
140
141
142
143
144
145
146
147
148
149
150
151
152
153
154
155
156
157
158
159
160
161
162
163
164
165
166
167
168
169
170
171
172
173
174
175
176
177
178
179
180
181
182
183
184
185
186
187
188
189
190
191
192
193
194
195
196
197
198
199
200
201
202
203
204
205
206
207
208
209
210
211
212
213
214
215
216
217
218
219
220
221
222
223
224
225
226
227
228
229
230
231
232
233
234
235
236
237
238
239
240
241
242
243
244
245
246
247
248
249
250
251
252
253
254
255
256
257
258
259
260
261
262
263
264
265
266
267
268
269
270
271
272
273
274
275
276
277
278
279
280
281
282
283
284
285
286
287
288
289
290
291
292
293
294
295
296
297
298
299
300
301
302
303
304
305
306
307
308
309
310
311
312
313
314
315
316
317
318
319
320
321
322
323
324
325
326
327
328
329
330
331
332
333
334
335
336
337
338
339
340
341
342
343
344
345
346
347
348
349
350
351
352
353
354
355
356
357
358
359
360
361
362
363
364
365
366
367
368
369
370
371
372
373
374
375
376
377
378
379
380
381
382
383
384
385
386
387
388
389
390
391
392
393
394
395
396
397
398
399
400
401
402
403
404
405
406
407
408
409
410
411
412
413
414
415
416
417
418
419
420
421
import numpy as np
import onnxruntime as ort
from ast import literal_eval
from typing import List, Dict, Tuple, Callable, Optional, Union, Any

class Detection:
"""表示目标检测中的单个检测结果"""

def __init__(self,
class_id: int,
class_name: str,
confidence: float,
x_center: float,
y_center: float,
width: float,
height: float,
image_scale_x: float = 1,
image_scale_y: float = 1):
"""
初始化检测结果对象

参数:
class_id: 类别ID
class_name: 类别名称
confidence: 置信度分数
x_center: 边界框中心x坐标
y_center: 边界框中心y坐标
width: 边界框宽度
height: 边界框高度
image_scale_x: x轴缩放因子,默认为1
image_scale_y: y轴缩放因子,默认为1
"""
self.class_id = class_id
self.class_name = class_name
self.confidence = confidence

# 计算缩放后的中心点和尺寸
scaled_center = (x_center * image_scale_x, y_center * image_scale_y)
scaled_size = (width * image_scale_x, height * image_scale_y)
half_size = (scaled_size[0] * 0.5, scaled_size[1] * 0.5)

# 计算边界框的左上角和右下角坐标
self.x1, self.y1 = scaled_center[0] - half_size[0], scaled_center[1] - half_size[1]
self.x2, self.y2 = scaled_center[0] + half_size[0], scaled_center[1] + half_size[1]
self.area = scaled_size[0] * scaled_size[1]

def __str__(self) -> str:
"""返回检测结果的字符串表示"""
return f"{self.class_name} ({self.confidence:.2f}) [{self.x1:.1f}, {self.y1:.1f}, {self.x2:.1f}, {self.y2:.1f}]"

class ONNXYOLODetector :
"""ONNX模型的封装,提供简单的接口进行目标检测"""

# 可用的执行提供程序,按优先级排序
PROVIDER_PRIORITY = ["CUDAExecutionProvider", "CoreMLExecutionProvider", "CPUExecutionProvider"]

@staticmethod
def _calculate_iou(box1: Detection, box2: Detection) -> float:
"""
计算两个检测框之间的IoU(交并比)

参数:
box1: 第一个检测框
box2: 第二个检测框

返回:
计算得到的IoU值,范围为[0,1]
"""
# 计算交集区域
x1 = max(box1.x1, box2.x1)
y1 = max(box1.y1, box2.y1)
x2 = min(box1.x2, box2.x2)
y2 = min(box1.y2, box2.y2)

inter_w, inter_h = max(0, x2 - x1), max(0, y2 - y1)
if inter_w <= 0 or inter_h <= 0:
return 0

# 计算交集面积和并集面积
intersection_area = inter_w * inter_h
union_area = box1.area + box2.area - intersection_area

# 防止除零错误
if union_area <= 0:
return 0

return intersection_area / union_area

def __init__(self,
model_path: str,
confidence_threshold: float = 0.35,
nms_iou_threshold: float = 0.45,
class_filter: Optional[Callable[[int, str], bool]] = None,
use_gpu: bool = True):
"""
初始化YOLO目标检测器

参数:
model_path: ONNX模型文件路径
confidence_threshold: 最小置信度阈值,用于过滤检测结果
nms_iou_threshold: 非极大值抑制的IoU阈值
class_filter: 用于过滤有效类别的函数,接收类别索引(int)和标签(str),返回布尔值
use_gpu: 是否使用GPU进行推理,默认为True
"""
self.model_path = model_path
self.confidence_threshold = confidence_threshold
self.nms_iou_threshold = nms_iou_threshold

# 如果未提供类别过滤器,则默认所有类别都有效
self.class_filter = class_filter or (lambda class_id, class_name: True)

# 初始化模型
self._initialize_model(model_path, use_gpu)

def _initialize_model(self, model_path: str, use_gpu: bool) -> None:
"""
初始化ONNX模型

参数:
model_path: ONNX模型文件路径
use_gpu: 是否使用GPU
"""
# 设置执行提供程序
providers = self.PROVIDER_PRIORITY if use_gpu else ["CPUExecutionProvider"]

# 初始化ONNX运行时会话
self.session = ort.InferenceSession(model_path, providers=providers)

# 获取输入输出名称
self.input_name = self.session.get_inputs()[0].name
self.output_name = self.session.get_outputs()[0].name

# 从模型元数据获取输入尺寸和类别名称
self._load_metadata()

def _load_metadata(self) -> None:
"""从ONNX模型加载元数据信息"""
meta = self.session.get_modelmeta()
custom_metadata = meta.custom_metadata_map

# 获取模型输入尺寸
if "imgsz" not in custom_metadata:
raise ValueError("ONNX模型缺少'imgsz'元数据")

self.input_size = np.array(literal_eval(custom_metadata['imgsz']))

# 获取类别名称映射
if "names" not in custom_metadata:
raise ValueError("ONNX模型缺少'names'元数据")

self.class_names = literal_eval(custom_metadata["names"])

def _validate_input(self, image: np.ndarray) -> None:
"""
验证输入图像格式

参数:
image: 输入图像

引发:
TypeError: 如果图像不是uint8类型的numpy数组
ValueError: 如果图像不是HxWxC格式的RGB图像
"""
# 确保图像格式正确
image = np.squeeze(image)
if not (isinstance(image, np.ndarray) and image.dtype == np.uint8):
raise TypeError("输入必须是uint8类型的numpy数组")

shape = image.shape
if not (len(shape) == 3 and shape[-1] == 3):
raise ValueError("输入必须是HxWxC格式的RGB图像")

def _preprocess_image(self, image: np.ndarray) -> Tuple[np.ndarray, np.ndarray]:
"""
预处理输入图像

参数:
image: 原始图像,HxWxC格式(高度x宽度x通道)

返回:
预处理后的图像和原始图像到预处理图像的缩放因子
"""
import cv2

# 获取原始图像尺寸
original_shape = np.array(image.shape[:2]) # 高度和宽度

# 调整图像大小
resized_image = cv2.resize(image, tuple(self.input_size))

# 归一化到[0,1]
normalized_image = resized_image.astype(np.float32) / 255.0

# 转换为CxHxW格式并添加批次维度
chw_image = np.transpose(normalized_image, (2, 0, 1))
batched_image = np.expand_dims(chw_image, axis=0)

# 计算缩放因子 (original / input_size)
scale_factors = original_shape / self.input_size

return batched_image, scale_factors

def _run_inference(self, processed_image: np.ndarray) -> np.ndarray:
"""
执行模型推理

参数:
processed_image: 预处理后的图像

返回:
模型的原始输出

引发:
RuntimeError: 如果推理失败
"""
# 执行推理
outputs = self.session.run([self.output_name], {self.input_name: processed_image})

if len(outputs) != 1:
raise RuntimeError("ONNX模型推理失败")

return outputs[0]

def _extract_prediction_data(self, predictions: np.ndarray) -> Tuple[np.ndarray, np.ndarray]:
"""
从预测中提取边界框数据和类别分数

参数:
predictions: 模型的原始输出

返回:
边界框数据和类别分数
"""
# 移除批次维度
predictions = np.squeeze(predictions)

# 验证输出形状
n_classes = len(self.class_names)
expected_first_dim = 4 + n_classes # 4个bbox坐标 + 类别数量

if predictions.shape[0] != expected_first_dim:
raise ValueError(f"输出形状不匹配:预期第一维为{expected_first_dim},实际为{predictions.shape[0]}")

# 提取边界框数据 (x_center, y_center, width, height)
bbox_data = predictions[:4, :]

# 提取类别分数
class_scores = predictions[4:, :]

return bbox_data, class_scores

def _apply_nms(self, bbox_data: np.ndarray, class_scores: np.ndarray,
scale_factors: np.ndarray) -> List[Detection]:
"""
应用非极大值抑制算法

参数:
bbox_data: 边界框数据 (x_center, y_center, width, height)
class_scores: 类别分数
scale_factors: 缩放因子

返回:
检测结果列表
"""
n_det = bbox_data.shape[1] # 检测数量
if n_det <= 0:
return [] # 无检测结果

# 找出每个检测的最高得分类别
class_ids = np.argmax(class_scores, axis=0)

# 获取每个检测的最高得分
max_scores = np.take_along_axis(class_scores, class_ids[None, :], axis=0).squeeze()

# 按得分降序排序
sorted_indices = np.argsort(max_scores)[::-1]

# 保存有效检测结果的列表
valid_detections = []

# 记录被抑制的检测
suppressed_mask = np.zeros(n_det, dtype=bool)

# 遍历所有检测并应用NMS
for i, idx in enumerate(sorted_indices):
# 获取当前检测的类别和置信度
class_id = class_ids[idx]
class_name = self.class_names[class_id]
confidence = max_scores[idx]

# 检查是否应跳过此检测
if (suppressed_mask[idx] or
not self.class_filter(class_id, class_name) or
confidence < self.confidence_threshold):
continue

# 创建检测对象
detection = Detection(
class_id,
class_name,
confidence,
*bbox_data[:4, idx], # x_center, y_center, width, height
scale_factors[1], # x轴缩放
scale_factors[0] # y轴缩放
)

# 添加到有效检测列表
valid_detections.append(detection)

# 抑制与当前检测框重叠的低置信度检测
self._suppress_overlapping_detections(
sorted_indices[i+1:],
bbox_data,
class_ids,
max_scores,
suppressed_mask,
scale_factors,
detection
)

return valid_detections

def _suppress_overlapping_detections(self,
indices: np.ndarray,
bbox_data: np.ndarray,
class_ids: np.ndarray,
max_scores: np.ndarray,
suppressed_mask: np.ndarray,
scale_factors: np.ndarray,
reference_detection: Detection) -> None:
"""
抑制与参考检测框重叠的检测框

参数:
indices: 要检查的检测索引
bbox_data: 边界框数据
class_ids: 每个检测的类别ID
max_scores: 每个检测的最大置信度
suppressed_mask: 被抑制的检测掩码
scale_factors: 缩放因子
reference_detection: 参考检测框
"""
for idx in indices:
# 获取当前检测的类别和置信度
class_id = class_ids[idx]
class_name = self.class_names[class_id]
confidence = max_scores[idx]

# 如果已被抑制或不符合条件,跳过
if (suppressed_mask[idx] or
not self.class_filter(class_id, class_name) or
confidence < self.confidence_threshold):
continue

# 创建检测对象
detection = Detection(
class_id,
class_name,
confidence,
*bbox_data[:4, idx], # x_center, y_center, width, height
scale_factors[1], # x轴缩放
scale_factors[0] # y轴缩放
)

# 计算IoU并决定是否抑制
iou = self._calculate_iou(reference_detection, detection)
if iou > self.nms_iou_threshold:
suppressed_mask[idx] = True

def _process_predictions(self, raw_predictions: np.ndarray,
scale_factors: np.ndarray) -> List[Detection]:
"""
处理原始预测结果转换为检测对象

参数:
raw_predictions: 模型的原始输出
scale_factors: 缩放因子

返回:
检测结果列表
"""
# 提取预测数据
bbox_data, class_scores = self._extract_prediction_data(raw_predictions)

# 应用非极大值抑制
detections = self._apply_nms(bbox_data, class_scores, scale_factors)

return detections

def get_class_mapping(self) -> Dict[int, str]:
"""
获取类别ID到名称的映射

返回:
包含所有可检测类别的{id: name}字典
"""
return {i: name for i, name in enumerate(self.class_names)}

def detect(self, image: np.ndarray) -> List[Detection]:
"""
对图像执行目标检测

参数:
image: 输入图像,HxWxC格式(高度x宽度x通道)

返回:
检测结果列表
"""
# 验证输入
self._validate_input(image)

# 预处理图像
processed_image, scale_factors = self._preprocess_image(image)

# 执行推理
raw_predictions = self._run_inference(processed_image)

# 处理预测结果
detections = self._process_predictions(raw_predictions, scale_factors)

return detections

可视化代码和结果

1
2
3
4
5
6
7
8
9
10
11
12
13
14
15
16
17
18
19
20
21
22
23
24
25
26
27
28
29
30
31
32
33
34
35
36
37
38
39
40
41
42
43
44
45
46
47
48
49
50
51
52
53
54
55
56
57
58
59
60
61
62
63
64
65
66
67
68
69
70
71
72
73
74
75
76
77
78
79
80
81
82
83
84
85
86
87
88
89
90
91
92
93
94
95
96
97
98
99
100
101
102
103
104
105
106
107
108
109
110
111
112
113
114
115
116
import cv2
from pathlib import Path
import numpy as np
from onnx_yolo_detector import ONNXYOLODetector
from PIL import Image, ImageDraw, ImageFont
import os
import hashlib

def get_color_for_label(label):
hash_obj = hashlib.md5(label.encode())
hash_hex = hash_obj.hexdigest()

r = int(hash_hex[:2], 16)
g = int(hash_hex[2:4], 16)
b = int(hash_hex[4:6], 16)

min_val = 60
max_val = 200
r = min(max(r, min_val), max_val)
g = min(max(g, min_val), max_val)
b = min(max(b, min_val), max_val)

return (b, g, r) # 返回BGR格式

def draw_bbox(image, detection, bbox_color=(0,0,255), txt_color=(255,0,0)):
"""
在图像上绘制边界框和标签

Args:
image (np.ndarray): 输入图像
detection (Detection): 检测结果对象
bbox_color (tuple, optional): 边界框BGR颜色. 默认为 (0,0,255).
txt_color (tuple, optional): 文本BGR颜色. 默认为 (255,0,0).

Returns:
np.ndarray: 绘制完成的图像
"""
class_name = detection.class_name
confidence = detection.confidence
x1, y1, x2, y2 = map(lambda x: int(x), (detection.x1, detection.y1, detection.x2, detection.y2))
img_size = image.shape[:2]


img_copy = image.copy()
line_thickness = max(2, int(max(img_size) * 0.0018)) # 增加粗细系数,确保最小为2像素
cv2.rectangle(img_copy, (x1, y1), (x2, y2), bbox_color, line_thickness)
pil_img = Image.fromarray(cv2.cvtColor(img_copy, cv2.COLOR_BGR2RGB))
draw = ImageDraw.Draw(pil_img)
font_size = int(max(img_size) * 0.018)
try:
font_paths = [
"C:/Windows/Fonts/simhei.ttf", #
"C:/Windows/Fonts/msyh.ttf",
"/usr/share/fonts/truetype/droid/DroidSansFallbackFull.ttf"
]
font = None
for path in font_paths:
if os.path.exists(path):
font = ImageFont.truetype(path, font_size)
break
if font is None:
font = ImageFont.load_default()
except:
font = ImageFont.load_default()

text = f"{class_name}({confidence:.2f})"
draw.text((x1, y1 - font_size - 5), text, fill=txt_color[::-1], font=font)
return cv2.cvtColor(np.array(pil_img), cv2.COLOR_RGB2BGR)

def detect_and_draw(model, image_path, output_path=None):
"""
在图像上执行目标检测并绘制结果

Args:
model (ONNXYOLODetector): ONNXYOLODetector模型实例
image_path (str): 输入图像路径
output_path (str, optional): 输出图像路径. 如果为None则自动生成

Returns:
np.ndarray: 绘制完成的图像
"""
img_path = Path(image_path)
img = cv2.imread(str(img_path))
assert img is not None, f"无法读取图像: {image_path}"

detections = model.detect(img)

for detection in detections:
print(detection)
bbox_color = get_color_for_label(detection.class_name)
txt_color = (255 - bbox_color[0], 255 - bbox_color[1], 255 - bbox_color[2])
img = draw_bbox(img, detection, bbox_color=bbox_color, txt_color=txt_color)

if output_path is None:
output_path = str(img_path.parent / f"{img_path.stem}_detection.jpg")

cv2.imwrite(output_path, img)
print(f"检测结果已保存至: {output_path}")
return img

def demo():
"""运行演示"""
# 默认使用GPU
# model = ONNXYOLODetector("best.onnx")
# 使用CPU版本
model = ONNXYOLODetector("best.onnx", use_gpu=False)

# 检测单张图像
detect_and_draw(model, "1.png")

# 打印模型可检测的所有类别
classes = model.get_class_mapping()
print(f"模型可检测的类别: {classes}")

if __name__ == "__main__":
demo()

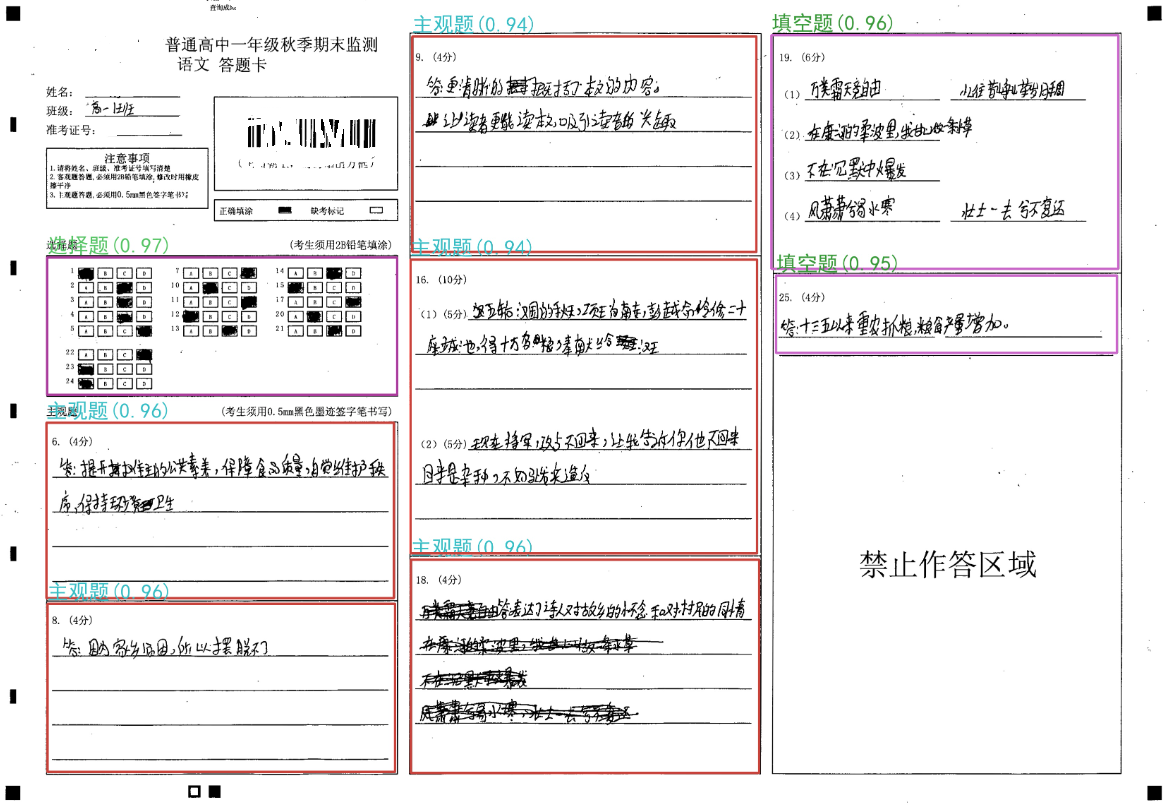
效果:


YOLO11答题卡题型区域识别
https://blog.kala.love/posts/d90ce61b/
作者
久远·卡拉
发布于
2025年5月21日
许可协议