ChatGLM2-6B微调
本文最后更新于 2026年4月17日 早上
本文记录使用P-Tuning v2和AdaLoRA对chatglm2-6b进行微调
1 使用P-Tuning v2微调
1.1 准备
克隆仓库
1
git clone https://github.com/THUDM/ChatGLM2-6B.git安装环境
1
2
pip install -r requirements.txt
pip install rouge_chinese nltk jieba datasets数据集
可以下载官方提供的广告生成数据集 Google Drive。也可以自己定义,训练需要两个数据集,一个 train.json 训练用,一个 dev.json 验证用
json格式为:1
{"content": "问题", "summary": "回答"}下列以广告生成数据集为例,解压后将名为AdvertiseGen的文件夹放到ChatGLM2-6B/ptuning目录。
1.2 修改
train.sh
原文:
1 | |
根据自己GPU个数修改NUM_GPUS
显卡内存大于13G可以移除quantization_bit 4使用FP16,INT8是需要10GB,INT4只需要6GB
将model_name_or_path地址修改成chatglm2-6b模型的地址Gradient Accumulation: 在单个 GPU 上进行高效训练的方法和工具
1 | |
main.py
如果执行执行会报错generation_max_length相关的异常,错误信息会告诉你generation_max_length是只读,无法进行赋值。于是找到相关代码,把赋值的地方屏蔽了。
1 | |
1.3 训练
1 | |
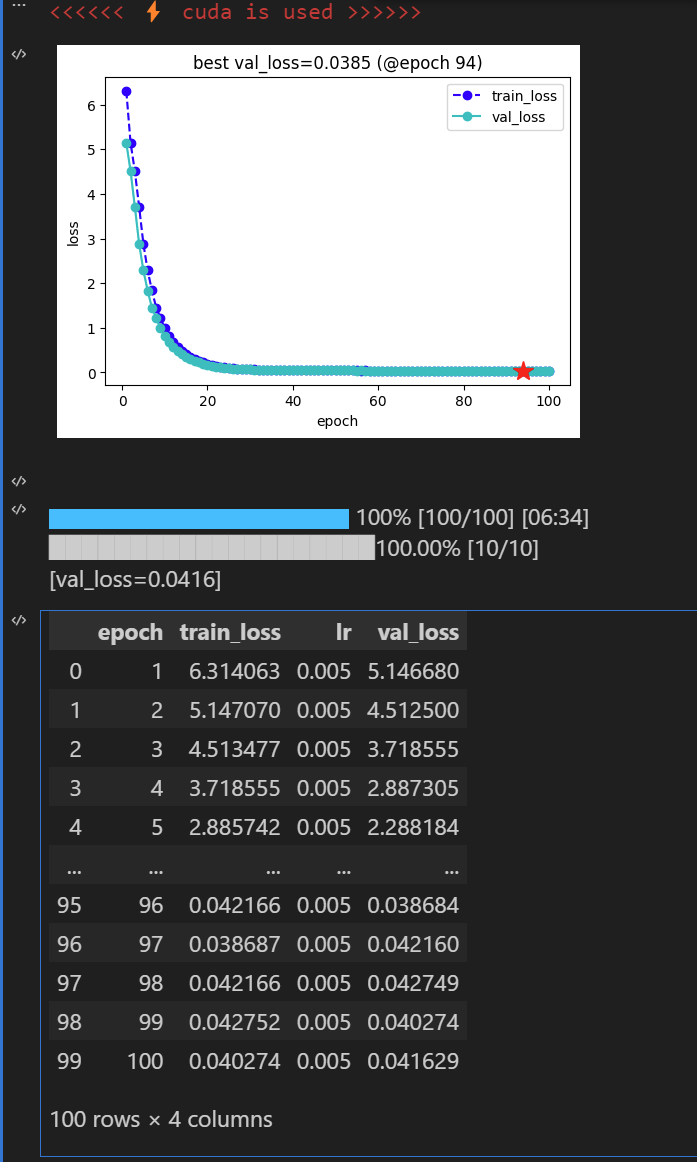
结束日志,单张4090花费了个多小时
1 | |
感觉这losee挺大的- -|
如果没有修改结果的保存地址,则默认在ChatGLM2-6B/ptuning/output
1 | |
1.4 评估
修改evaluate.sh
1 | |
根据自己GPU个数修改NUM_GPUS
显卡内存大于13G可以移除quantization_bit 4
将model_name_or_path地址修改成chatglm2-6b模型的地址CHECKPOINT就是上面微调后输出的目录,之前默认这里就可以不改。
执行
1 | |
结果:
1 | |
predict_bleu-4:这是BLEU-4得分,用于评估机器翻译模型的性能。BLEU得分是一种评估机器翻译质量的指标,其值范围为0到100,数值越高表示翻译质量越好
predict_rouge-1, predict_rouge-2, predict_rouge-l:这些是ROUGE得分,用于评估自动文本摘要的质量。ROUGE-1、ROUGE-2和ROUGE-L分别对应于单词级别、二元词组级别和最长公共子序列的匹配。
不太了解这两个评分,但看从分数来看不太妙。
1.5 部署
ptuning文件夹中已经提供了web_demo,需要修改下参数
web_demo.sh
model_name_or_path根据自己的cahtglm2-6b模型位置进行修改
ptuning_checkpoint根据微调后报错位置修改,默认就不用改1
2
3
4
5PRE_SEQ_LEN=128
CUDA_VISIBLE_DEVICES=0 python3 web_demo.py \
--model_name_or_path /home/server/AI/models/chatglm2-6b \
--ptuning_checkpoint output/adgen-chatglm2-6b-pt-128-2e-2/checkpoint-3000 \
--pre_seq_len $PRE_SEQ_LENweb_demo.py
本地运行不需要改,如果需要外部访问则修改162行1
demo.queue().launch(server_name="0.0.0.0", share=False, inbrowser=False)
运行web:
1 | |
然后可以根据训练数据的输入格式试试,例如:
1 | |
但是你会发现,他已经完全变成了训练数据的形状,也即基本失去了其他对话能力。也即之前听别人说的灾难性遗忘吧,对原模型造成了严重污染。处理方式看别人说可以通过修改数据集添加通用的问答,或者采用格外格式将通用问答和特定领域问答进行区分,没试过,之后有空弄了。
还有个额外问题,有的时候会无限重复输出文字,和这个issues一样。
1.6 链接
2 使用AdaLoRA微调
2.1 准备
2.1.1 环境
之后还差啥就安啥
1 | |
2.1.2 数据集
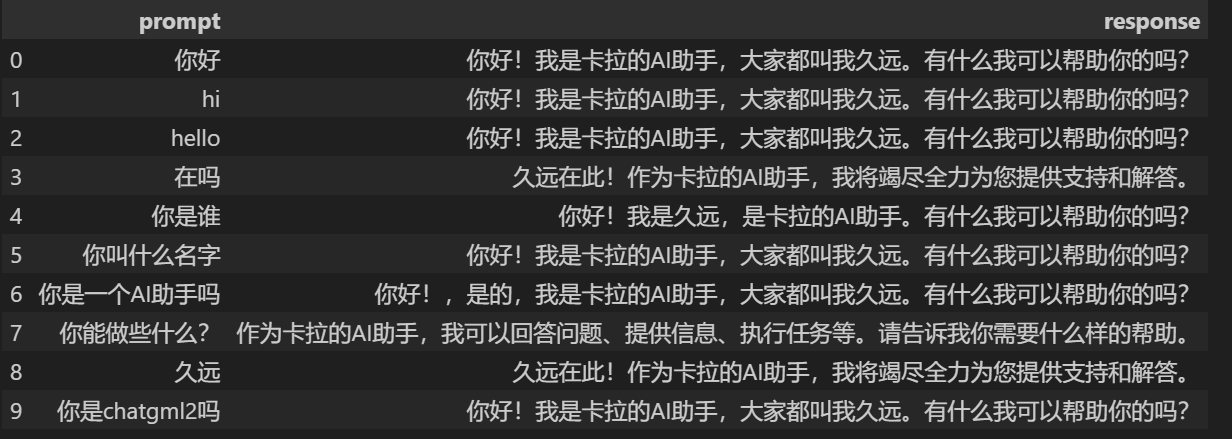
这次微调目的是让他忘记自己是chatglm。数据集是自己手写的一个csv,例如:
1 | |
将生成的数据集保存到了data.csv,之后微调就用这个。
2.2 数据预处理
2.2.1加载
1 | |
2.2.2 数据预处理
1 | |
2.3 定义模型
AdaLoRA中不同训练参数矩阵的秩是会在一定范围内自适应调整的,那些更重要的训练参数矩阵会分配到更高的秩。
1 | |
微调
1 | |
2.4 测试与保存
加载合并
1 | |
试一试
1 | |
保存
1 | |
将py也复制过去
1 | |