本文最后更新于 2022年10月19日 上午
Flutter是谷歌推出的一个移动应用开发框架,通过Dart语言开发,可跨平台。
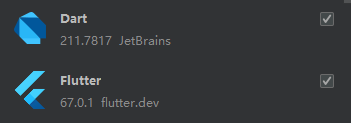
1 环境
2 hello world 2.1创建项目 在文件->新建中选择创新新的flutter项目,选择flutter SDK位置,点击下一步
打开创建完成的项目,可以直接点击运行,我是使用的android平板实体机,如果虚拟机运行则自己创建一个。默认项目是一个点击按钮,累加数字的应用。
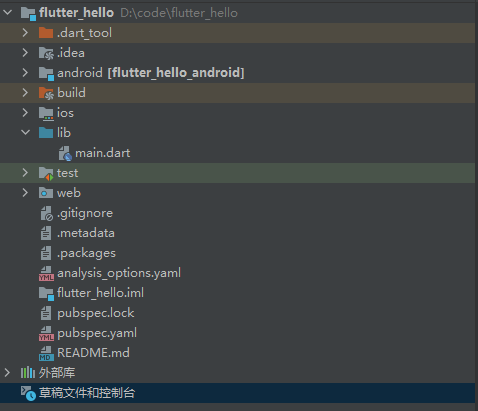
2.2 项目目录说明
文件或目录
说明
.dart_tool
记录了一些dart工具库所在的位置和信息
.idea
android studio 是基于idea开发的,.idea 记录了项目的一些文件的变更记录
android
Android项目文件夹
ios
iOS项目文件夹
lib
lib文件夹内存放我们的dart语音代码
test
用于存放我们的测试代码
.gitignore
git忽略配置文件
.metadata
IDE 用来记录某个 Flutter 项目属性的的隐藏文件
.packages
pub 工具需要使用的,包含 package 依赖的 yaml 格式的文件
flutter_hello.iml
工程文件的本地路径配置
pubspec.lock
当前项目依赖所生成的文件
pubspec.yaml
当前项目的一些配置文件,包括依赖的第三方库、图片资源文件等
2.3 代码 2.3.1 导入包 1 import 'package:flutter/material.dart' ;
这里只导入了一个material,它时一个UI组件库
2.3.2 应用入口 1 2 3 void main ()const MyApp ())
这里的runApp是启动 flutter应用,参数是一个widget
2.3.3 应用 class MyApp就是一个应用,继承StatelessWidget,所有也是一个widget。widget需要i共一个build方法,来描述如何构建UI界面
1 2 3 4 5 6 7 8 9 10 11 12 13 class MyApp extends StatelessWidget { const MyApp ({Key ? key }) : super(key : key ); @override Widget build(BuildContext context ) { return MaterialApp ( title : 'Flutter Demo ', theme : ThemeData ( primarySwatch : Colors .blue , ), home: const MyHomePage (title : 'Flutter Demo Home Page '), ); } }
2.3.4 首页 首页被定义为了一个有状态的widget,需要传入字符串作为标题。然后里面又创建了一个状态_MyHomePageState,主要是为了默认的点击累加的应用,能根据状态改变重绘UI。
1 2 3 4 5 6 7 8 class MyHomePage extends StatefulWidget MyHomePage ({Key ? key, required this .title}) : super (key: key);final String title;@override State <MyHomePage > createState() => _MyHomePageState();
最终实际显示的UI在_MyHomePageState中,里面有一个_counter变量用于保存累加计数,_incrementCounter函数作为按钮点击的回调,该函数会在累加后调用setState方法,它会通知框架状态已经改变,需要重绘界面。
1 2 3 4 5 void _incrementCounter () {setState (() {
这里的build会根据状态改变而重新调用。
1 2 3 4 5 6 7 8 9 10 11 12 13 14 15 16 17 18 19 20 21 22 23 24 25 26 27 28 29 @override build (BuildContext context) {return Scaffold (appBar : AppBar (title : Text (widget.title),body : Center ( child : Column ( mainAxisAlignment : MainAxisAlignment.center, children : <Widget>[Text ('You have pushed the button this many times:' ,Text ('$_counter' ,style : Theme.of (context).textTheme.headline4,floatingActionButton : FloatingActionButton (onPressed : _incrementCounter, tooltip : 'Increment' ,child : const Icon (Icons.add),
StatelessWidget用于不需要维护状态的场景,它通常在build方法中通过嵌套其它 widget 来构建UI,在构建过程中会递归的构建其嵌套的 widget
1 2 3 4 5 6 7 8 9 10 11 12 13 14 15 16 17 18 19 20 class Echo extends StatelessWidget Echo ({Key ? key,this .text,this .backgroundColor = Colors .grey, super (key:key);final String text;final Color backgroundColor;@override Widget build(BuildContext context) {return Center (Container (Text (text),
使用:
1 2 3 Widget build (BuildContext context ) {return Echo (text : "hello world" );
在build参数中的context,是用于在widget树中关联上下文
这个在之前例程用过,它可以根据状态改变来重绘。StatefulWidget会有一个对应的state类,但它被改变时,可以通过setState()方法来通知widge,更新UI。
例程:
1 2 3 4 5 6 7 8 9 10 11 12 13 14 15 16 17 18 19 20 21 22 23 24 25 26 27 28 29 30 31 32 33 34 35 36 37 38 39 40 41 42 43 44 45 46 47 48 49 50 51 52 53 54 55 56 57 58 59 60 61 62 63 64 65 66 class CounterWidget extends StatefulWidget const CounterWidget({Key? key, this .initValue = 0 });final int initValue;@override class _CounterWidgetState extends State <CounterWidget > int _counter = 0 ;@override void initState() {super .initState();print ("initState" );@override print ("build" );return Scaffold('$_counter ' ),@override void didUpdateWidget(CounterWidget oldWidget) {super .didUpdateWidget(oldWidget);print ("didUpdateWidget " );@override void deactivate() {super .deactivate();print ("deactivate" );@override void dispose() {super .dispose();print ("dispose" );@override void reassemble() {super .reassemble();print ("reassemble" );@override void didChangeDependencies() {super .didChangeDependencies();print ("didChangeDependencies" );
使用:
1 2 3 4 5 6 7 8 9 10 11 12 13 class MyApp2 extends StatelessWidget MyApp2 ({Key ? key}) : super (key: key);@override Widget build(BuildContext context) {return MaterialApp (Flutter Demo ',ThemeData (Colors .blue,CounterWidget (),
上面例程中initState函数,只会在首次构建时调用,didUpdateWidget则时在父widget调用setState()方法时被调用。reassemble用于测试,热重载(hot reload)时会被调用,此回调在Release模式下永远不会被调用。deactivate是当state对象被移除时调用,如果之后没用重新插入,则又会触发dispose
1 2 3 4 5 6 7 8 9 10 11 12 13 14 15 16 17 18 19 20 21 22 23 24 25 26 27 28 29 30 31 32 33 34 35 36 37 38 39 40 41 42 43 44 45 46 47 48 49 50 51 52 53 54 55 56 57 class ParentWidget extends StatefulWidget @override class _ParentWidgetState extends State<ParentWidget> false ;@override Widget build(BuildContext context) {return Container (TapboxB (class TapboxB extends StatelessWidget TapboxB ({Key ? key, this .active: false , required this .onChanged})super (key: key);final bool active;final ValueChanged <bool> onChanged;Widget build(BuildContext context) {return GestureDetector (Container (Center (Text (Active ' : 'Inactive ',TextStyle (fontSize: 32.0 , color: Colors .white),200.0 ,200.0 ,BoxDecoration (Colors .lightGreen[700 ] : Colors .grey[600 ],
当然也可以父子widget都设置为StatefulWidget,都具备管理state的功能
3.3 组件
Text:格式文本
Row:水平布局
Column:垂直布局
Stack:层叠布局
Container:容器
Material组件,例程中使用过,示例1 2 3 4 5 6 7 8 9 10 11 12 13 14 15 16 17 18 import 'package:flutter/material.dart' ;return MaterialApp (title : 'Flutter Demo' ,theme : ThemeData (primarySwatch : Colors.blue,home : const MyHomePage (title : 'Flutter Demo Home Page' ),home : Scaffold (appBar : AppBar (title : const Text ('Flutter Demo Home Page' ),body : Column (children : [titleSection],
4 路由 路由即是不同页码跳转的导航,也可以说一个路由是一个页面,和android中的activity是一样的。
示例:
1 2 3 4 5 6 7 8 9 10 11 12 13 14 15 16 17 18 import 'package :flutter/material.dart';class NewRoute extends StatelessWidget NewRoute ({Key ? key}) : super (key: key);@override Widget build(BuildContext context) {return Scaffold (AppBar (Text ("New route" ),Center (Text ("This is new route" ),
然后在main.dart中导入,并将home指向它
1 2 3 import 'package:flutter_hello/newRoute.dart' ;
注册路由
1 2 3 routes: {(context) =>
通过路由名打开新页面,注意的是路由跳转需要在StatefulWidget中,直接在之前的MyApp中写个按钮跳转是会报错的,下面例子是通过点击按钮在两个页面之间跳转
1 2 3 4 5 6 7 8 9 10 11 12 13 14 15 16 17 18 19 20 21 22 23 24 25 26 27 28 29 30 31 import 'package :flutter/material.dart';import 'package :flutter/cupertino.dart';import 'package :flutter_hello/newRouteCp.dart';class NewRoute extends StatefulWidget NewRoute ({Key ? key}) : super (key: key);@override State <NewRoute > createState() => _NewRoute();class _NewRoute extends State<NewRoute> @override Widget build(BuildContext context) {return CupertinoPageScaffold (CupertinoNavigationBar (Text ("页面1号" ),Center (CupertinoButton (CupertinoColors .activeBlue,Text ("点击跳转页面2号" ),Navigator .of(context).pushNamed(NewRouteCp .routeName);
newRouteCp.dart这是第二个页面,代码和上面差不多也就是跳转位置变了,就不贴了。
1 2 3 4 5 6 7 8 9 10 11 12 13 14 15 16 17 18 19 20 21 22 23 import 'package :flutter/material.dart';import 'package :flutter_hello/newRoute.dart';import 'package :flutter_hello/newRouteCp.dart';MyApp ());class MyApp extends StatelessWidget MyApp ({Key ? key}) : super (key: key);@override Widget build(BuildContext context) {return MaterialApp (Flutter Demo ',ThemeData .light(),NewRoute (),NewRoute .routeName: (context) => NewRoute (),NewRouteCp .routeName: (context) => NewRouteCp (),
如果需要在切换页面时候传递参数:
1 2 3 4 5 6 @override Widget build (BuildContext context ) {var args=ModalRoute .of (context).settings .arguments ;
1 Navigator .of (context).pushNamed("new_page" , arguments : "hi" ) ;
MyApp类的MaterialApp中首页设置也可以使用initialRoute,上面使用的是home。
5 引入包或其他资源 5.1 引入包 配置文件pubspec.yaml被用来管理第三方的包。而三方包可以通过PUB 上查找。
以下是之前例程里面的pubspec.yaml,依赖包需要添加到dependencies下,例如其中的english_words: ^4.0.0,之后通过页面顶部按钮进行下载。
1 2 3 4 5 6 7 8 9 10 11 12 13 14 15 16 17 18 19 20 21 22 23 24 25 26 27 28 29 30 31 32 33 34 35 36 37 name: flutter_hello description: A new Flutter project. publish_to: 'none' version: 1.0 .0 +1 environment: sdk: ">=2.16.2 <3.0.0" dependencies: flutter: sdk: flutter english_words: ^4.0.0 cupertino_icons: ^1.0.2 dev_dependencies: flutter_test: sdk: flutter flutter_lints: ^1.0.0 flutter: uses-material-design: true
引入包:
1 import 'package:english_words/english_words.dart' ;
以上是导入被登记在库中的包,如果引入本地包可用写为
1 2 3 dependencies: pkg1: path: ../../code/ pkg1
gihub上的包
1 2 3 4 dependencies: pkg1: git: url: git:
5.2 引入assets assets 包括静态数据(例如JSON文件)、配置文件、图标和图片等
1 2 3 4 flutter : assets : - assets/my_icon.png - assets/background.png
或者
1 2 3 flutter: assets: /images/
加载文本:
1 2 3 import 'package:flutter/services.dart' show rootBundle;'assets/config.json' );
加载图片:
1 Image .asset('graphics /background.png');
如果是包中图片:
1 Image.asset('icons/heart.png' , package : 'my_icons' )
其他 dart语言 变量
var 变量名 = 值,定义的变量类型会更加值被确定下来,并且不可修改
Object 变量名 = 值,所有类型都是Object的子类,可以被任意修改。通常在未知变量类型的时候使用
dynamic 变量名 = 值,它会在运行时被确定类型,错误无法在编译时被发现.相较于Object,dynamic保持更多的方法
final和const用于修饰不想被修改的变量,const会在编译时直接替换为常亮,final则是在第一次使用时被初始化
空判断
定义可空变量
判断是否为空,其中变量!是告诉编译器这东西已经判断过了,肯定不是空1 2 3 4 5 6 7 8 if (i!=null ) if (fun !=null )fun !()
函数
不指定类型的函数,默认返回类型为dynamic
只有一个表达式的函数可以简写
1 void test ()"test" );
函数变量
1 2 3 4 var test = (){"test" )
函数作为参数
1 2 3 4 void execute var callback ) { callback (); } execute print ("xxx" ))
组合多个类 1 2 3 4 5 6 7 8 9 10 11 12 13 14 15 16 17 18 19 20 21 22 23 24 25 26 class Person {'say' );mixin Eat {'eat' );mixin Walk {'walk' );mixin Code {'key' );class Dog with Eat, Walk {}class Man extends Person with Eat, Walk , Code {}
私有构造函数 ._() 如果有一个仅包含静态方法和常亮的Dart类,我们希望该类不可实例化,但即使我们不提供任何构造函数,Dart默认为该类创建一个空的构造函数。为了防止实例化,可以通过创建私有构造函数来解决。
1 2 3 4 5 6 7 class MyUtils {static void printMessage() {print ('Woolha.com' );


